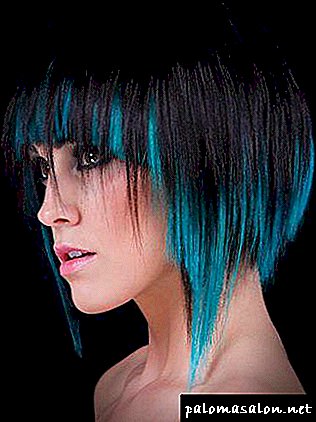
Highlighting for many years occupies a leading position among the preferences of modern fashionistas. Ideally, this type of staining is best performed by a specialist. However, for lovers of budget options there is great news - highlighting your own hands is possible! If you do not have long hair, you can make highlights with a cap. It is enough to master the technology of performance and prepare everything you need. It is advisable to attract an assistant, since working on the occipital zone without help will not work. How to make highlights through the cap? This will be discussed in the article.

Benefits of highlighting
Before learning how to make highlights using a cap at home, let's talk about the advantages of this type of coloring:
- Refreshes the face and hair color, allowing you to avoid sudden color transitions.
- Creates visual volume and contributes to the shine of hair.
- Looks great with regrown roots and does not require a quick update.
- It does not cause much harm to the hair and scalp, as the individual elements are exposed.
- It has a truly rejuvenating effect and is suitable for any age.
- Effectively hides gray hair.
- Corresponds to modern trends of naturalness and naturalness of the palette.
Disadvantages of highlighting
Highlighting through the cap is not such a simple procedure. It takes a long time, in particular, the step of stretching the strands is very time consuming. You can also highlight the following disadvantages:
- Any lightening harms the hair. Do not perform the procedure for at least a month after curling.
- It is impossible to create a uniform application without help when painting the house.
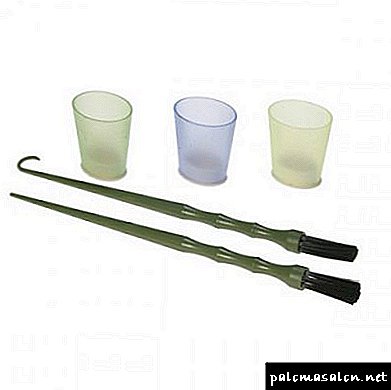
What is needed?
- Little cap
- Hook.
- Means for clarification: when working with dark and tough hair, a 12% clarifier is suitable, with thin blond hair it is necessary to prepare a 3-4 percent concentrate. Sometimes they use paint several tones lighter than their own strands. Important: if the hair was previously stained with henna - you should not lighten the curls yourself because of the unpredictability of the result.
- Gloves.
- Mixer container.
- Brush for applying brightener.
- Polyethylene (you can use food film: cover it with curls coated with the composition, which will enhance the reaction).
- Sheet on the shoulders or barber cape.
Stages of doing highlighting
- Comb your hair, put on a cooked cap and proceed to pulling the strands through the holes in the cap. Try to get strands of equal width. When using a purchase cap, strands can be obtained from each hole, or at intervals (medium and intense highlighting), depending on the desired result.
- The composition is more effective to dissolve in the container after threading the strands through the cap - this way you will work with a freshly prepared mass, and this will improve the result.
- Apply the prepared mixture to the strands, threaded through the cap holes. When applied to work with light movements, in no case do not crumple strands to prevent smudges through the holes in the cap. To enhance the effect, it is sometimes recommended to use a polyethylene film - this increases the insulation, thereby accelerating the chemical reaction on clarification.
- The waiting time is usually stated in the instructions for the lightening agent. The interval may vary depending on the stiffness and the original hair color. Typically, the procedure time is from 15 to 45 minutes. It is important to maintain the recommended interval, otherwise the hair may be damaged or the result does not meet expectations. It is necessary to independently observe the course of clarification: due to the increased porosity of the hair, the effect may occur earlier than the stated time.
- At the end of the procedure, the brightening cream should be thoroughly washed off the hair, without removing the cap. Next, release the head from the headdress and wash the hair again with shampoo and grooming agent to feed it after lightening. Hair restoration is necessary after any lightening, so this stage should in no way be ignored. Home-care kits often contain nutritional masks for leaving after the procedure.
- The final step is the toning of the strands, which is necessary to mitigate and prevent visual color drops. This work is best done at least three days after lightening; you should not overload your hair with excess chemicals.
Highlighting with a cap or foil: which is better?
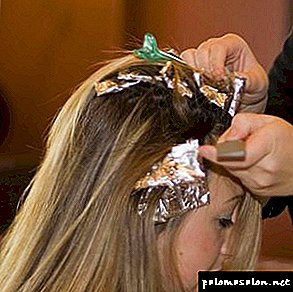
The variant of highlighting with foil is incredibly relevant, since it contributes to good staining of the strands. In addition, it allows you to work with several tones, increasing the depth of color. Dye covered curls and wrapped in foil. At the same time, the edge of each sheet of foil is bent inwards by at least one centimeter (to avoid leakage).
To perform highlighting with foil, it is necessary to prepare a similar list, with the exception of one item - replace the cap with foil, plus a comb with a long end. And do not forget about the assistant. Perform the procedure on the occipital zone alone is unrealistic.
Often they ask the question: what is better, to be shaded through a cap or using foil? The answer is simple - with the obvious advantages of these methods, they have a different purpose: highlighting through a cap on short hair (no more than 15–20 cm) with the effort shown will be wonderful. But for long hair preferred method using foil.

Tips when performing highlighting through the cap at home
- It is not recommended to use previously streaked strands when re-dyeing, this can damage the quality of the hair structure.
- Hair should not be washed before dyeing, it will create a natural protective effect that can withstand the negative effects of oxide.
- Any lightening does not require prior preparation in the form of moisturizing the scalp
- To prevent allergies, it is better to conduct a test reaction in a small area of the arm, according to the instructions of the coloring composition.
- For thin and weak hair, do not rush to the process of lightening, it is advisable to carefully treat the hair beforehand.
- The thinner the “feathers” are obtained by threading through the cap, the more natural the result will be.
- Allocate classical highlighting and zonal. The first type involves the coloring of the entire length of the hair, threaded through the cap. Zonal - work is carried out with individual sectors. It opens up broad opportunities for creativity: "asymmetry", "diagonal", radical application of coloring composition, "avant-garde" and many other types of intermediate dyeing.
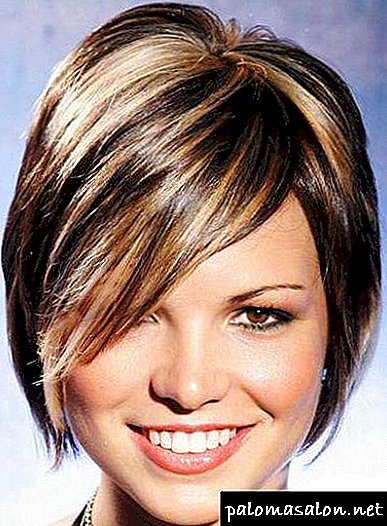
As a rule, highlighting through a cap on short hair (the photo represents the result of dyeing in the article) is no worse than during the procedure in the salon. If the outcome does not suit you, it will be easy to fix. But with long hair all the more serious. If you are not sure of success, do not take any chances and trust the masters in the salon!
Distinctive features of the technique

The method of coloring individual strands with a cap differs from the same classical method with foil in many ways.
- Despite the fact that highlighting hair through a hat is considered a simple technique, you need to have some experience in hairdressing. The main thing - to be able to at least a little to deal with accessories, which are sold complete with a cap and paint.
- The procedure is faster than using foil. In addition, this method is more convenient for beginner hairdressers and non-professionals who dye their hair at home.
- The method of dyeing through the cap at home is designed exclusively for short hair, the maximum length is up to the chin. Even the most professional hairdresser will not be able to gently carry out the procedure on long hair, the effect will be unimportant. Short strands are easily pulled out and not confused with each other.
If all these conditions are suitable for you, then you can safely proceed to the procedure.
Coloring cap
In order to carry out the procedure, you will need a special cap. It is sold separately or comes bundled with a straightening paint. The second option is more convenient, since in this case you will find a special hook in the package that you can easily pull out the straps through the holes in the cap. In the video you can see that the hook is replaced with a thick needle with a blunt end or a comb with a special tail. But this again requires a certain skill.
Hats can be disposable or reusable. Disposable caps are made of polyethylene, they need to work very carefully so as not to damage the material. Holes are designed for pulling strands. If you want to make frequent highlighting at home, then pull the strands through each hole. For rare staining - every third. The most convenient form is in the form of a cap, since in this case the cap is conveniently fixed with the help of ties.
If you have failed to buy a special cap, and you want to make highlighting, use the available tools. This may be a rubberized cap for the pool, on which you first need to make holes. The most budget option - the use of a plastic bag, tight to the head. But here holes on it in advance it is not necessary to do.
Highlighting procedure
For dyeing strands you will need: a cap, gloves, a brush for applying paint, a comb, a container for diluting the paint, a dyeing compound, a towel. Highlighting hair through a hat passes in stages.
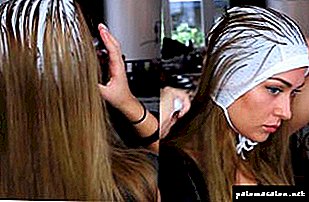
- Throw a towel over your shoulders, and put on a special or homemade hat on your head.
- Use a special hook or tip of the comb to pull the locks through the holes in the right amount.
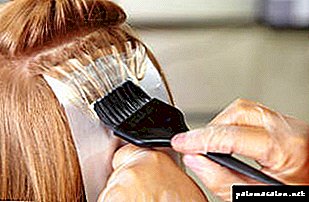
- Prepare the coloring composition and with a brush, apply it to the strands. The paint should be freshly diluted, so you should not prepare the composition in advance.
- Depending on the desired result, the paint is kept on the hair from 15 to 45 minutes. The longer the composition will remain on the head, the more brightened the hair.
- Wash off the paint from the strands without removing the cap.
- Remove the cap and carefully wash your hair with shampoo so that there are no traces of paint left on them. Be sure to use a mask or conditioner for hair after washing.

In the photo you can make sure that with this technology you can not only lighten the strands, but also give them a shade. That is, highlighting can be performed not only brightening the composition, but also any other paint.
What is highlighting through the cap
 The process of lightening individual strands on the head in the world of hairdressing is called "highlighting." To this end, the master selects individual curls from the head of hair and put on them a bleaching composition.
In order for the dye not to get on other strands, and highlighting is not "smeared", the treated curls need to be isolated. There are two methods for this:
- wrapping in foil strips. It requires little skill, professionalism and is used primarily in the beauty salon,
- selective lightening hair through the cap. The method is outdated, but simple and does not require special skills. It is more popular in home coloring.
Council Highlighting can be used to mask the gray hair. Clarified strands will hide this defect, visually give the hairstyle volume.
To suit
Highlighting on the cap will give zest, individuality to everyone, regardless of the shade of the hair. It is worth noting that dark hair coloring looks spectacular. It is not necessary to highlight the entire head of hair, you can do it selectively. For example, perform a few bleached strands from the face or along the parting.
Highlighting with a cap is not performed on long hair, only on short or medium (in the beauty salon). If the procedure is performed at home, the haircut should not be below the chin line. It will save from the painful sensations and torn out scraps of hair.
Advantages and disadvantages
 The procedure for coloring strands through a special cap has significant advantages:
- You get a fashionable hairstyle, an updated image, while causing minimal damage to the curls, as opposed to a solid paint,
- the coloring process can be performed at home, the actions are so simple that special professionalism and skills are not required,
- foil during home dyeing can shift, which affects the final result, while the cap sits tightly on the head,
- special cap is used repeatedly, if properly used, washed after painting.
If we talk about the shortcomings of this outdated method, it is worth focusing on the following facts:
- highlighting through a cap on long curls is not carried out. The owners of the thick hair of medium length,
- it is difficult to experiment with a special cap, the holes for pulling the strands are evenly spaced over a certain distance,
- if during the procedure you pull too thick strand, it is impossible to return it back, you will have to remove the accessory and repeat the whole process,
- if hair is naturally confused, then lightening can be quite painful, and the wrong actions of the artist will cause even more entanglement.
Despite these drawbacks, the method with a cap is the best option for beginners and non-professionals.
What to choose a hat or foil
 For the popular clarification of curls using foil or a special cap. What are their differences and main advantages?
- For professional hairdressers, it is better to choose foil: it is possible to experiment with the image; it is acceptable to use several colors for dyeing at the same time.
- Highlighting on the cap is easier to perform; care is required from the performer and respect for the sequence of actions. Plus, the procedure takes less time, it is not necessary to separate, strand and wrap each strand in foil.
- If you do not have enough time or money to go to the master, the option with a cap for you! Painting is carried out at home, the cap can be re-used, depending on its material, strength.
- When stretching the strands through the cap, it is almost impossible to make a perfect correction to the regrown roots, the necessary strands are not visible under the accessory.
- Lightening with foil is not accompanied by painful sensations; in the case of a cap, discomfort is possible.
And finally, the most important criterion that influences the final choice of the method is the length of the hair. It is difficult for the owners of short haircuts to dye the foil; in this case, even some masters turn to the cap. But for strands above 15–20 cm, the choice is made in favor of the foil.
Choice and cost hats
Highlighting cap sold in a specialty store for hairdressers. This can be a reusable rubberized or silicone accessory. He tightly wraps his head and does not move when pulling curls.
The cost of a silicone cap is 300 rubles and more, depending on the manufacturer.

Council A cap with a free edge is better.The edge can be unbent, thereby warning the client from getting paint on the face.
If you do not plan to use the cap in the future, choose a one-time accessory made of polyethylene. Such caps are fixed with ties, but they cannot be compared with the density of fit to the head of hair, in comparison with the rubberized cap. Disposable caps for highlighting are sold in sets, 4–12 pieces each. The cost of a set of 240 rubles.

Choose an accessory for painting with a hook. It will not be reflected in the price, but will relieve of troubles in its search.
Judging by the user reviews, reusable silicone cap is much more practical, more reliable and easier to use than a one-off.
Another tip, hats come with holes and without. If you do not want to pierce them yourself, which sometimes causes slight difficulties, choose the first option. However, in the second case, you will make holes of the desired diameter, neither more nor less.

Making an important accessory yourself
If the purchase of a cap for painting does not go well, do not be discouraged, make it your own hands from improvised means. There are several options:
- From tight package. Take a package that fits your head, cut it so that it does not fall on your face during the procedure. Holes are made directly when pulling curls, and not in advance.

- From swimming caps in the pool. Attention cap for the shower is not suitable! It should be rubberized, fit snugly to the head. It makes holes in advance, and only then you can wear on his head.

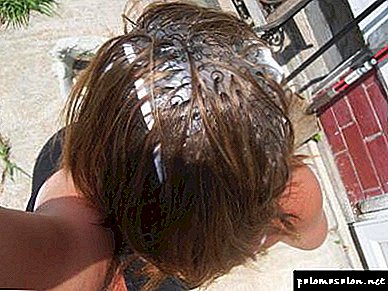
Paint technology at home
The process of selective lightening strands at home with a special cap is simple. The main thing is to understand the nuances of the procedure and follow the recommendations from the professionals.
For painting at home, you need to prepare the following items and tools:
- special hat
- strand hook, can be metal,
- capacity for mixing the dye and the developer
- paint a few tones lighter than natural hair or lightening powder,
- oxide 3–12%, depending on the structure of the hair and the original tone,
- a pair of gloves,
- plastic cap, bag to enhance the reaction of clarification,
- paint brush
- hairbrush,
- shampoo and hair balm,
- old towel or cape on the shoulders.
Important! For brunettes, brown-haired women, owners of hard hair, choose 12% oxide, and 3% oxidant is enough for blondes.
 Detailed staining instructions:
- Well comb the curls with a comb. The hair should be dry, washed 3-4 days before the day of painting.
- Put on a hat for highlighting on the head. It should fit snugly, not hang out.
- Thread the hook into the hole in the cap and remove the strand. The thickness of the order, how much they pull, depends on their own preferences. Do the procedure over the entire head.
- In a plastic (glass) container, prepare a clarifier.
- Apply lightening agent to the threaded strands. Do this evenly, without undue savings.
- To speed up the chemical reaction and enhance the effect of the brightener, wrap dyed hair with plastic wrap or wear a bag.
- After some time, recommended by the manufacturer of the brightening agent, remove the polyethylene. See how bright the strands are. If necessary, hold the tool for another 5 minutes. Take into account, the total exposure time should not exceed 45 minutes, otherwise you risk to burn the hair, turn it into "straw".
- Without removing the cap, wash the clarifier under a stream of warm water.
- Remove the accessory and wash your head again, but using shampoo.
- To heal weakened locks, make a mask or use a balm.
To smooth out possible differences in color on the hair, to eliminate possible yellowness, use a tinting balm, silver or purple shampoo.
Highlighting hair using a special cap will not cause you difficulties if you strictly adhere to the rules and technology of its implementation. The result of painting will refresh and rejuvenate the appearance, giving it playfulness and individuality. In addition, such a technique of clarification helps to hide gray hair and turn from a brunette into a blonde with less harm to the curls.
Useful videos
Highlighting on the cap itself.
How to make hair highlighting at home on the cap.
A variety of technology
 Classical highlighting was carried out with the help of foil, in which the master wrapped the strands treated with the brightening solution. This method reduces the time of exposure to paint, as a chemical reaction without contact with air is faster. But at the same time increases the risk of burn hair. And the strands themselves have to be deployed every 10-15 minutes in order to control the degree of their clarification.
Then another technique appeared - open highlighting. The strands were previously collected in small bunches and fixed with rubber bands, stained the ends of these tails to the desired length. But this method is not very convenient, because it does not allow to adjust the width of the clarified strands.
When California calorie paint is applied first to a thick comb, and then with it is distributed on the head of hair. This allows you to create a beautiful effect of natural sun-bleached hair. But it does not allow the uniform arrangement of colored strands over the area of the head.
Features capturing meliovaniya
Highlighting using a cap differs from highlighting on a foil in that it is an open technique. And from other varieties - the ability to choose the width of the strands and their location, as well as the convenience of working even on very short hair. Through the cap, you can highlight haircuts with hair length already from 5 cm. But this technique, with all simplicity, has its own characteristics and secrets.
How to choose an accessory
A necessary attribute for work is a small cap with holes. You can buy it in a specialty store or make it at home. There are disposable accessories made of thin cellophane, as well as reusable plastic or silicone. The latter are preferable, as they are:
- tight to the head and do not "move out" while working,
- do not allow paint with strands to flow into the roots,
- make it possible to wash away the clarifier well without removing the cap.
 But it costs several times more expensive than plastic. But if you are a supporter of highlighting at home through a hat and plan to do it regularly, then it is better to fork out and work with comfort once.
A thick plastic cap with a stitched frame is also quite comfortable. Its size is universal, and the holes are rather dense and symmetrical. Applied crosses make it easy to count the distance between the strands with rare highlighting or coloring.
But a disposable cap for highlighting has, perhaps, only one plus - low cost. It is easily torn, loosely attached to the head and quite uncomfortable at work. Masters in good salons never use them. It is suitable only for those who are trying to do home highlighting for the first time and are not sure that they want to repeat it. These hats are often present in ready-made sets that are sold in stores.
To suit
Although highlighting on a hat is one of the most simple and versatile techniques, it is not suitable for everyone. The main limitation is the length of the hair. If it is more than 15 cm, it will be extremely difficult to stretch even a thin strand through a small hole, especially in a silicone cap. Hair will begin to be tangled, and if you make an extra effort, you can damage the roots. So the best base is a short or medium haircut.
You should not use this technology even with badly damaged hair that has lost its firmness and elasticity. If the holes in the cap are too large, it is almost impossible to draw thin strands of the same width through them. And when pulling through a narrow hole, loose hair will tear and, as a result, you just have to cut it off.
It is almost impossible to make a highlight on a cap on a very curly head. Such hair is also very confused. But even if you can remove them through the hole, in the finished hairstyle bleached strands are confused with the natural and will be more like gray hair, especially if you slightly overdo the paint.
It is very convenient to highlight dark and even black hair in this way. In this case, it is important to wash off the oxidizer in time so as not to get an ugly off-yellow shade. In addition, all the strands are already prepared, and the paint is applied very quickly, which means that the hair will be brightened evenly.
Performance technique
The technique of highlighting the cap is quite simple. The preparatory process takes most of the time. In addition to the cap itself, you will need: a thin hook with a blunt tip (so as not to scratch the skin), a bowl and a paint brush, a pair of towels, hand gloves and a drape to protect clothes.
Step by step the execution process looks like this:
 Hair should be carefully combed, parted in the usual place.
- Put a hat on your head, fix it well.
- Insert the hook into the hole on the cap and gently pull the strand out.
- Repeat the procedure over the entire head with the required thickness.
- Dilute the brightening compound and apply it to the elongated strands with a brush.
- If you need to speed up the reaction, wrap the head with cellophane.
- When the desired degree of clarification is achieved, wash off the paint without removing the cap.
- Free the hair by gently pulling off the cap (with its head tilted down).
- Apply a restoring balm on them and gently massage.
- After 3-5 minutes, wash your hair well again, dry it and put it in your hair.
 Hair should be carefully combed, parted in the usual place.
Important! If coloring is performed with a cap, it is better to first color the strands in additional colors and apply a brightener last - so there is less risk of burning the hair.
At home
This highlighting is easy to do yourself, even at home. And with minimal cost. There are a couple of simple ways to make a hat for highlighting at home from scrap materials. And with the technology of staining you are already familiar. Those who want to get a more complete picture of the procedure can find detailed instructions with a photo or video and strictly follow it so that everything is done correctly.
If the house has an old swimming cap - this is just the perfect option. Holes in it can be pierced with a red-hot awl or a special hole punch, with the help of which additional holes are made in the belts. It is advisable to pre-mark up so that they are evenly spaced.
An even less costly option is a plastic shower cap or a plastic bag that you have to tie around your head or secure with a rubber band. Holes in it, too, must be done in advance, so as not to exert effort and not to injure the skin, punching them with a hook directly during dyeing.
Time to extract strands at home is almost unlimited, so you should not rush. Having done highlighting a couple of times, you will learn how to do it quickly, without damaging your hair, but at first it is better to be careful.
With a neat and careful implementation of home highlighting using the cap is no different from the salon.
Hair care
The natural fat layer can protect the hair from strong drying out. Therefore, it is better not to wash your hair for 1-2 days before highlighting.
 But keep in mind that if they are left with styling products, it will be impossible to pull a thin strand through a narrow hole. In good salons, the master washes his head, but special protective ampoules are added to the composition.
Do not forget about quality hair care after highlighting. Even this gentle method loosens their structure and makes it more fragile. Therefore, the use of special shampoos and regular use of masks, especially in the first two weeks after dyeing - are required.
Also make sure that the thermal effect on the hair was minimal. And, going out into the open sun, always use products with UV protection.
Highlighting - is it relevant?
Highlighting, in my opinion, is always relevant and not influenced by fashion. Modern people who want to look spectacular, often resort to such a renewed image. Highlighting is a selective dyeing of strands in a color that differs radically from the main hairline, or in a couple of tones.
This procedure is carried out by experts in all hairdressing and beauty salons. If you do not have the opportunity to pay for this procedure, or for some reason you do not trust the master, you can do the painting yourself or use the help of a friend.
The best option would be to carry out highlighting through a special cap designed for this procedure.
This method is perfect for owners of long hair (by the way, the method is suitable for hair of any length).
To get the result, not inferior to the work of the master, you need to read and carefully observe the technology which will be described in detail in this article. You will also learn a lot about the highlighting procedure.
Positive and negative aspects of the procedure
The procedure for painting individual strands has a number of advantages, including:
- Unaffected by fashion, always relevant and looks spectacular.
- Perfectly hides gray hairs and whole battles.
- Suitable for any age category, having a rejuvenating effect (melirovannye hair "folds" 5-7 years of age with visual perception).
- The chemical effect of the paint does not apply to the skin and those hair that will not be colored.
- The renewal procedure can be repeated once every 3-4 months, as regrown roots do not spoil the overall look of the hairstyle.
- Hair looks more voluminous.
As with any procedure, highlighting has a number of disadvantages:
- Independently carrying out the procedure is difficult, you can not do without outside help if you want to perform it qualitatively.
- A month before the highlighting, and a month after the hair cannot be dyed, curled and bleached.
- The chemicals included in the paint, harm the structure of the hair.
- The process is laborious and time consuming, requiring the quick and accurate execution of sequential actions.
Conducting highlighting procedure
For too long hair (more than 35 cm) this method of dyeing is not suitable.
As already noted, this process is painstaking, so for the high-quality implementation of highlighting, it is necessary to have patience.
Even the one who never was engaged in a similar method of coloring can cope with it.
A cap for the procedure can be bought at a cosmetics store. It is made of silicone, rubber or polyethylene, it has a lot of holes in order to pull the strands out through them with a special hook (after it is also commercially available) and then paint them.
If it is not possible to purchase a hat and a hook, you can resort to alternative options. As a cap for highlighting, use swimming rubber (after which it cannot be used for its intended purpose) or cellophane cosmetic.
Holes are made in them in a checkerboard pattern, so that the distance between the nearest holes is 2-3 cm It is also recommended to use a crochet hook to pull the strands out. It all depends on your imagination and available items.
Preparation for highlighting
This process includes the preparation of the necessary tools and tools. We will need:
- Paint. The main and main participant in the process.The paint is chosen on the basis of the main color of hair: with light hair - use dark tones, with dark hair - on the contrary, light colors. You can choose a dye mixture for several tones lighter or darker than the basic color range of hair.
- Matter to cover the shoulders and back (barber cape, towel or a simple piece of cloth).
- Cellophane cap (or package, cut on one side). It is necessary to create a greenhouse (thermal) effect, in which dyes more actively penetrate into the structure of the curls.
- Cosmetic brush. Choose not too big, but not small. Ideal size - 2-3 cm wide.
- Utensils for the preparation of coloring mixture.
- Gloves for protecting hands (polyethylene or rubber).
- Special cap.
- Hook (if you use any other convenient tool instead, remember that it should not be made of metal, as the active components of the paint react with different metals).
- Assistant (without him anywhere).
Step-by-step instruction
Strictly follow the rules listed below. Violation of the process can lead to severe damage or loss of hair.
Stages of the procedure:
- Comb your hair well (there should be no tangled and overlapping strands).
- Put on the cap as tightly as possible. Start getting your hair through the crochet holes. Try to pull out equal in volume curls. The cap from the manufacturer has a large frequency of holes, so you can get strands through each - if you want to receive frequent highlights, through one - more rare.
- Prepare the coloring mixture in the pot.
- Stick to the staining of those strands that you got through the holes. For application, use a cosmetic brush, carefully brushing it all areas. Pay special attention to the tips.
- After application, create a greenhouse effect on the head by donning a cellophane cap (or bag) over the colored curls. This effect contributes to a more active penetration into the hair structure of dyes.
- Wait 20-25 minutes. It is not necessary to withstand more, since it will not give the best result, but only “burn” colored hair. As a result, you will receive not streaked strands, but bunches of brittle straw.
- After the time has elapsed, rinse the composition from the hair with warm water using a hypoallergenic shampoo (a children's one is perfect). For 100% flush, repeat the procedure.
- Apply to wet hair a restoring mask that will produce nourishment and repair of strands damaged during dyeing.
- Wash off the mask and allow the hair to dry naturally (without using a hair dryer, forceps, etc.).
Useful tips
- If thin strands are pulled out through the holes, the effect of highlighting will look more natural (here it is at the discretion of each).
- Having too dry and brittle hair, you should refrain from dyeing procedures, since you can aggravate existing problems with hair. Complete the process of restoring the curls through the use of nourishing masks and hair balms.
- Make sure that you are not allergic to the component composition of the coloring agent. To do this, apply a small amount of paint on your wrist and wait 10 minutes. If the skin does not turn red, and itching does not start - you do not have allergies, you can safely begin.
- Do not wash your hair for 2-3 days before the highlighting procedure, as the fatty secretions of the sebaceous glands present on the hair partially neutralize the action of aggressive substances that make up the dye.

Conclusion
If you have the desire and ability to perform the procedure at home, then perfectly follow the rules described above, and you will get the result, no worse than that of a professional master. This is especially true for owners of long strands, since on shorter hair it will be much easier to correct the highlights that did not work out. Doubt your strength - better not start, but use the service provided by hairdressers and beauty salons.
Hair coloring techniques
There are many different techniques that can be used to straighten strands, for example, using foil and without it, with using the cap, combs, etc. For highlighting with foil are necessary:
- Composition for clarification strand, consisting of powder and oxidant. For fine hair, the percentage of oxidant in the powder should be 4%, for light hair - 8%, for dark hair - 12%.
- Brush for applying and distributing paint.
- Special or household foil.
- Two combs - with a narrow long handle and to separate the strands.
- Gloves.
- Glass or plastic container for coloring composition.
- Towel.
Technique of highlighting hair on foil:
 When using food foil it is necessary to cut it into strips, which should be 23 cm longer than your hair. The edge of each strip must be bent inward by 1 cm - to prevent effluent clarifier on the scalp and strands nearby.
- Throw a towel over the shoulders and prepare the coloring composition, following the instructions. Divide all hair into zones. Each of them pin a hairpin. A long hairbrush to separate not too thick strand from a head of hair. Put a strip of foil under it. The pocket should be located at the base of the hair. Lubricate the strand painting mixture. Then fold the foil in half or cover the strand with another piece. Pull back about 2 cm and paint over the next curl. Similarly, do it all over the head.
- Wait about half an hour, then unfold each strand and rinse with running water without removing the foil. Then remove it, wash your hair with using shampoo and balsam and let the hair dry naturally.
 When using food foil it is necessary to cut it into strips, which should be 23 cm longer than your hair. The edge of each strip must be bent inward by 1 cm - to prevent effluent clarifier on the scalp and strands nearby.
Highlighting with a cap
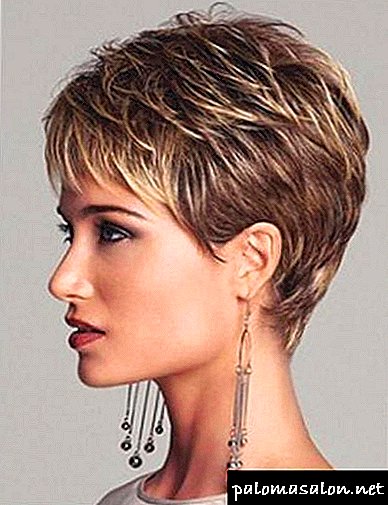
 The most simple way of highlighting through a hat at home is popular with girls with short haircuts, whose hair is not more than 15 cm long.
What is needed for hair highlighting:
- Composition for bleaching.
- Gloves.
- Paint brush.
- Special hat with small holes. You can replace it with a cellophane package. It is necessary to cut holes in it in a checkerboard pattern.
- Comb with a narrow long handle.
- Capacity for painting a mixture of glass or plastic and a towel.
- Throw a towel over your shoulders. Put a hat on your head and stretch small strands into the holes with the end of a comb. For easy highlighting, every third hole should be used, for the medium one, every second, for the intensive one, everything. Prepare the ink mixture according to the instructions and apply it to the hair, using a brush.
- To lighten hair on 1 tone, keep the composition for 15 minutes, for strong - at least 45 minutes.
- Rinse the locks with water, without removing the cap. Then wet the hair with a towel, then remove the cap and wash your hair with shampoo and mask.
Foil-free dyeing
 This type of highlighting is referred to as California. With the help of fresh air, you can get smooth transitions and the effect of burnt out strands.
In order to dye strands, you will need:
- Composition for bleaching.
- Paint brush.
- Hairbrush.
- Gloves.
- Capacity for coloring composition and towel.
- Cover the shoulders with a towel. Comb and separate strands of a width of 1 cm - in a staggered manner and exclusively on the horizontal partitions. Prepare the bleaching mixture following the instructions. Then apply it on the strands with a brush, holding it parallel to the hair. Paint should not fall on other areas. It is possible to shift the colored curls with paper napkins.
- Keep the paint on the hair no more than 40 minutes, and then wash with shampoo and balm.
 Shatush - a gentle way to change hair color and make changes in appearance. But this is a rather complicated procedure and requires a certain skill. If you are sure that you can do it on your own, then you will need to work:
- Clips for hair.
- Hairbrush.
- Towel.
- Coloring mixture and tinting agent.
- Brush and towel.
- Separate several strands with a thickness of 2 cm in a chaotic manner and secure them with clips.
- To comb one of the strands and lubricate it with a brightening composition, making light and careless strokes, stepping back a couple of centimeters from the roots.
- Repeat similar actions with all strands.
- Wait at least 40 minutes and then wash the strands with water.
- After that, apply a tonic on the hair, as recommended by the manufacturer.
- Wash your hair with shampoo and apply a nourishing mask.
Highlighting on short strands is better to perform through the cap, since when using other equipment it will be inconvenient to separate them.
For long ones, it is better to use only foil, because it will be impossible to remove the cap after the dyeing and washing procedure.
Both methods are suitable for a head of hair of average length, but nevertheless it is better to give preference to highlighting with foil, because with this technique it is easier to correct regrown roots.
Thus, familiarizing yourself with the different techniques of dyeing and knowing where to start highlighting, you can choose the option that is most suitable for your hair length and make it yourself at home.
What tools and supplies are needed?
- Cap.
 You can buy ready-made in a cosmetic store or a hairdresser. You can make a disposable hat for highlighting at home on their own. For this you need a shower cap or a rubber cap for the pool.
In it you need to make holes of the desired size. If a hole punch is used for this purpose, the strands will be wider.
As a cap, you can wear a transparent bag, but you need to firmly fix it around your head. Hook.
 It is best to choose a smooth iron hook without scratching the scalp components.
You can also use an iron tip for a hair comb for this purpose. Oxidizing agent.
For blond hair, an oxidant of 4-6% is suitable. But owners of dark hair should make a choice in favor of the oxidant 12%. For owners of red hair, a concentration of 6-8% is suitable, and for brown-haired women - 9-12%.
 If you choose an insufficient concentration, a yellowing effect may occur. You can choose a powder or a special paint, which contains an oxidizing agent. The powder has a significant disadvantage - it is almost impossible to get it, and with the help of it it is very easy to dry out and ruin the hair, because not all professionals are able to work with it correctly.
If the hair is dry and lifeless, it is best to choose paint on an oily basis. If you want to save time, you should give your choice in favor of cream inks.
Cosmetics and hairdresser's shops also sell high-grade hair highlighting kits, which includes all the listed tools and consumables.
How to wear a hat?
Using a hat is pretty easy. Hair is best divided into parting and combed back or to the side.
First, you need to take the cap by the bottom with all the fingers on your hands, except for large ones, and place it on your head so that it fits snugly to the crown.
With a quick movement, pull the base of the cap down and release the edges, gently removing your fingers from under the cap.
Phased highlighting from the roots and indented
It is necessary to ensure that the number of strands on the crown coincides with the number of strands from the right and left sides, so that the hair color is saturated and uniform.
 Apply paint on the hair that is stretched out from under the cap follows from the roots to the tips. If you want to highlight indentation, you just need to evenly pull the cap to the length that you want to retreat from the roots.
First, pull it a couple of centimeters (or the desired distance) from the top of the head, making sure that the indentation length is the same over the entire surface of the top. Then repeat these steps for the neck, right and left side.
It is advisable to use the second mirror and inspect the entire surface of hair growth from all sides. Experts offer the following detailed step-by-step instructions for performing highlighting on a hat at home:
- good to comb the hair along the entire length.
- Put a hat on the head for highlighting so that it covers the entire surface of the head.
- Using a small iron or plastic hook, gently pull thin strands of hair across the head from the holes on the cap.
- Only after completing the first three points, proceed to the dilution of the coloring composition, which consists of an oxidizer and paint. This composition should be fresh, so it is best to cook it after the strands are stretched.
- Apply the mixture to the hair. When all the hair will be covered with oxidizer and paint, put on a transparent bag on top, so that the dye discolored the hair effectively and efficiently.
- After 20-25 minutes, rinse hair with shampoo in warm water. The cap at this time should be on the head.
- Gently remove the cap and re-wash the hair with shampoo. Apply a nourishing balm or hair conditioner.
- Dry and blow-dry your hair, or let it dry naturally.
What affects the length of the curls?
- Short hair. For short hair is best suited for highlighting a cap, but experts recommend using for short hair a hook of smaller diameter, which can tightly capture a short strand. It is best to choose a hat with small holes to tightly lock the strands of hair in them.
- Medium hair easiest to lighten up at home. However, experts recommend mowing split ends before this procedure.
- Long hair. You can accidentally dye the unwanted part of the hair, if it will stick out from under the cap. All hairs that should retain the original color should be removed under the cap, after you pull out the desired strands for dyeing. After applying the paint you need to group all the colored strands on the crown, putting them together, not letting them hang from the head.
Exposure time: when to wash off the paint?
Light hair is enough 15-20 minutes of exposure of the paint. Red or chestnut from 20 to 30 minutes, but on dark hair it is best to keep the paint or oxidizer for at least 30-40 minutes. You can evaluate the result before removing the cap; it is necessary that the color of the colored strands be uniform from light, without a yellowish tint.
The paint should be washed off the first time, when the cap is still on the head, wearing gloves, washing the head well. The second time you can wash off the paint residue without gloves, very carefully.
Practical advice
- When choosing a hat is to give preference to durable and elastic materials.
- At repeated melirovaniye it is not necessary to put the painting structure on earlier highlighted strands.
- To prevent a possible allergic reaction, it is worth testing a paint or an oxidizer on the back of your hand.
- In order not to get dirty, you should use a cape or towel.
- Paint or oxidizer must be diluted in non-metallic utensils.
- It is best to treat split or weak hair before you light it.
- If you want to cut the tips, it should be done after the highlighting procedure, and not before it.
- The first 3-4 days it is better to abandon the use of ironing or curling.
- It is best to use an additional mirror to evaluate the result from all sides.
How to avoid failure? What if you made a mistake? Before applying the brightening compound to the hair, you need to make sure that the extra strands do not squeeze out from under the caps, that the paint is applied at the desired distance from the roots.
It is better to check several times than to make a mistake. Very important do not overdo the brightener on the hairIn the worst case, a strand of hair may simply fall off.
Repetition rate and subsequent care
Fully You can highlight hair every 6-8 monthsYou can lighten the roots after 2-3 months. It is better not to resort to this procedure after a perm, during pregnancy, after using henna and resistant paints of saturated colors.
 Hair should be nourished and moisturized at least 1-2 times a week., with the help of ready-made store balms and masks or traditional medicine. Flaxseed and coconut oil can be used for ingestion and for application directly to the hair. Well moisturizes and makes the hair stronger mask of orange honey, kiwi and a few drops of coconut oil.
Highlights perfectly refresh the image of any girl and woman. However, please note that this procedure should be carried out with care and accuracy.
Then the result will delight the fair sex, and her friends and colleagues will admire the name of the salon in which she did this procedure, without realizing that the highlighting was done by the girl or woman at home.