The French braid (or as it is called the spikelet) has already been loved by many simplicity of execution and a beautiful appearance. If your fingers have already “memorized” the technique, you can try to braid two spikelets at once, arranged parallel or on opposite sides of the parting. Do not be afraid to look like a young girl, because there are many elegant variations of hairstyles with spikelets.
What to do to facilitate the process of weaving?
Not everyone goes to weave neat spikelets. Fixing this will help adherence to several rules:
- Hair should be carefully combed. In order that they are less tangled in the process of weaving, pre-spray the spray to facilitate combing,
- On smooth, “crumbly” hair, weaving is poorly adhered, dissolves faster. It is recommended to slightly moisten the strands or use a locking agent, resembling wax for hair. These techniques will help to braid the spike tighter, it will last longer,
- Slightly wavy hair straighten the iron, it will greatly simplify weaving,
- The hardest part is the beginning. For beginners strands become tangled, fingers are not yet agile enough. To facilitate the task will help thin silicone gum, which can fix the beginning of weaving. When the hairstyle is ready, gum is cut with nail scissors,
- A braid is more comfortable to hold with your thumbs, and additional strands on the sides can be picked up with your little fingers. So it is easier to weave, the spike will be neat.
How to braid yourself two spikelets - video tips
It is not difficult, the main thing is not to hurry. Having tried to weave on oneself several times and having mastered the technique, it will already be easy to repeat, honing the accuracy of performance.
The difficulty of performing 2 spikelets on yourself:
- Hands on weight with habit are tired,
- Can not see the quality of weaving from behind, you have to work "by touch".
It is important to take a comfortable position and create the opportunity to see the quality of weaving in the process. To do this, you can use 2 mirrors or a webcam. In training on video from the Internet, it is important to pay attention to the technique of correct finger positioning.
How to braid two spikelets, the sequence of actions:
- Split the hair in the middle, carefully comb it,
- Choose the right or left side for the 1st spikelet, separate the hair strand from the parting near the forehead,
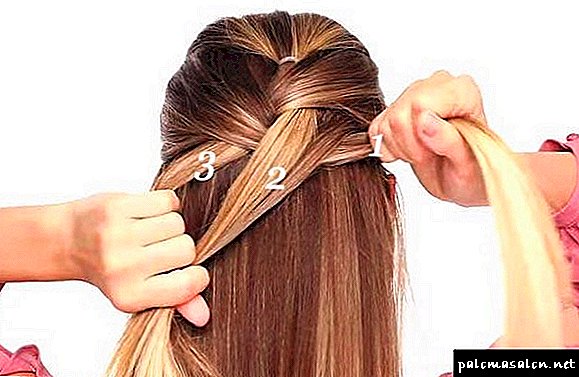
- The selected strand is divided into 3 parts, mentally numbered 1, 2, 3 starting from the left side,
- We impose strand 1 in the middle (strands 1 and 2 are interchanged),
- 3rd put between the second and first,
- To repeat the movements, evenly braiding hair to the strands on the sides, forming a spikelet,
- Braid weave to the end of the length of the hair, elastic band,
- Similarly done with a piece of hair on the other side of the parting.
It will be much more beautiful if the hair is slightly pulled out of the spikelets. Volumetric braids look impressive and are no longer associated with children's pigtails. Not a bad option to tighten the 2 braids in a bun at the back. With this hairstyle, you can go to work in the office, during the day with the fixation of varnish will keep the form.
How to weave two spikelets inside out?
When the classic (French) spikelets are worked out, you can vary your style in the wrong side. Spike inside out is also called the "Dutch" braid.
- Parting hair is divided into 2 equal parts,
- Choose which side to start, free fix the barrette, so that the strands do not interfere,
- Near the forehead grab a strand of average thickness, divided into 3 identical,
- Weaving is similar to the classic version, only here the strands are not superimposed over the rest, but weave inside out, moving to the bottom,
- Tie up loose hair you need thin strands, spikelets will look sleeker,
- After the first cone has a pigtail, you can proceed to the second,
- Purl spikelets slightly "dissolve" for the volume, pulling the weave to make the braids look fluffy.
"Greek" braids of 2 spikelets
This braid is different from others in that the braided frame the edge of the hair, revealing the face as much as possible. The weave resembles a crown, such a hairstyle causes delight in others. If the hair is of medium length, then it will turn out to make such a braid of 2 spikelets.
There are 2 weaving options:
- To capture the entire volume of hair in a braid from 2 sides of the parting,
- Two narrow spikelets on opposite sides, framing only part of the hair.
- Parting hair (even or beveled),
- The beginning of weaving is similar to the French spit - 3 small strands are separated near the forehead,
- Weave spikelet, picking up loose hair. On the one hand, he should be as close to his face as possible, as if “framing” him,
- For the expressiveness of the "crown" strands are taken thicker,
- Weave in the direction of the ear, grabbing the entire half of the hair until part or only a part
- Do the same with the 2nd side, repeating all actions exactly
- On the 2nd spikelet, it is important to take the same thickness with the first hair, otherwise they will be different.
Braid spikelets can be even on short hair - Boho braids
Oblique boho is easy to effectively hide the growing bangs. Such weaving is made on one side or on different sides of the parting. Braids will be enough to braid to the earlobe, leaving the rest of the hair loose.
Features boho spikelets:
- Weave free, not tight
- Slightly “disheveled” look, giving the image a touch of romance,
- The strands are drawn to give a volume effect,
- For the basis of taking any kind of spikelet - straight, purl, or simply twisted strands.
For beginners, 2 spikelets in the style of Boho - ideal. They are performed as standard, but look more casual. This is the case when small errors in the performance will not spoil the hair. Easy negligence in the image can be traced even on the catwalks in the collections of famous couturiers.
Parallel spikelets
On the Internet often flashed a photo of two spikelets located parallel. This is a great idea for those girls who get perfectly neat weaving. Of course, this hairstyle will take more time, but this is an excellent reason to surprise friends or colleagues at work.
Scheme of parallel spikelets:
- Hair separation straight or side parting,
- Begin with the upper spikelet, then proceed to the bottom,
- Separate 3 thin strands,
- They weave like an ordinary spikelet, but release strands from it from the side where the next one will be located. It is necessary to connect 2 spikelets to each other,
- Ready spike make out oblique, fasten with an invisible rubber band (transparent silicone),
They braid the second spike, weaving into it the remaining strands from the 1st. This should be around the face or slightly indented.
If the hair is thick, you can make parallel spikelets on the sides, making their ends a spectacular bunch of hair. For not thick hair, it is better to choose 2 parallel ones on the one hand, the second strontium is just combed out, decorate everything with a bun or with a regular tail (pigtail).
The idea of 2 parallel spikelets can be realistically carried out with the purl, but it will be problematic on itself. The decor of the finished hairstyle with a hairpin with stones, ribbons, beads will provide her with a special charm.
And read about how to braid braids with bows
It is easy to pick up the idea of weaving from the Internet. For two spikelets on the sides of the photo a lot. The quality of work depends on the performer’s imagination, his skill.
Mastering the braid weaving is the best option for how to spend your free time with pleasure and benefit. For any holiday, on a weekday, a self-made hairstyle will reduce the time and money spent on visiting the salon.
Having learned how to make amazing two spikelets on their own, photos of works from the Internet will no longer seem to be unattainable.
data-block2 = data-block3 = data-block4 =>
How to braid two braids on the sides ??

All the latest information in the article on the topic: "How to braid two braids on the sides ??".We have compiled a full description of all your problems.
The French braid (or as it is called the spikelet) has already been loved by many simplicity of execution and a beautiful appearance. If your fingers have already “memorized” the technique, you can try to braid two spikelets at once, arranged parallel or on opposite sides of the parting. Do not be afraid to look like a young girl, because there are many elegant variations of hairstyles with spikelets.
How to braid two spikelets to itself?
It is not difficult, the main thing is not to hurry. Having tried to weave on oneself several times and having mastered the technique, it will already be easy to repeat, honing the accuracy of performance.
The difficulty of performing 2 spikelets on yourself:
- Hands on weight with habit are tired,
- Can not see the quality of weaving from behind, you have to work "by touch".
It is important to take a comfortable position and create the opportunity to see the quality of weaving in the process. To do this, you can use 2 mirrors or a webcam. In training on video from the Internet, it is important to pay attention to the technique of correct finger positioning.
How to braid two spikelets, the sequence of actions:
- Split the hair in the middle, carefully comb it,
- Choose the right or left side for the 1st spikelet, separate the hair strand from the parting near the forehead,
- The selected strand is divided into 3 parts, mentally numbered 1, 2, 3 starting from the left side,
- We impose strand 1 in the middle (strands 1 and 2 are interchanged),
- 3rd put between the second and first,
- To repeat the movements, evenly braiding hair to the strands on the sides, forming a spikelet,
- Braid weave to the end of the length of the hair, elastic band,
- Similarly done with a piece of hair on the other side of the parting.
It will be much more beautiful if the hair is slightly pulled out of the spikelets. Volumetric braids look impressive and are no longer associated with children's pigtails. Not a bad option to tighten the 2 braids in a bun at the back. With this hairstyle, you can go to work in the office, during the day with the fixation of varnish will keep the form.
Training
A properly braided braid keeps its shape and neat appearance for a long time. In advance you need to prepare everything you need to not be distracted in the process:
- Comb, better than wood. It does not electrify the hair, does not spoil their structure, does not scratch the scalp. It is practical to have two combs: a massage brush and a comb with a pointed handle to part and separate the strands.
- Means for fixing hair: gel for styling individual strands, varnish to fix the result, mousse or wax to create volume at the roots, spray to impart obedience to hair.
- Accessories for hair: elastic bands, hairpins, invisible. You can make a bezel from the braid, decorate it with ribbons, ribbons, flowers, decorative pins, or, on the contrary, disguise the elastic with a strand of hair.
In the absence of experience, even simple weaving can be practiced on threads or ribbons to understand the principle. For beginners it is difficult to immediately weave a braid itself, it is better to try to braid someone else. You need to start with the simplest options, gradually moving to more complex ones. Beginners do not get everything right the first time, practice and perseverance are important - they will help you learn and achieve the desired result.

- The beautiful braid will turn out from pure hair, previously it is necessary to wash them, as usual.
- Dry hair electrify, poorly weave, confused. It is necessary to moderately use a hair dryer, apply moisturizing and fixative means to make the hair more obedient.
- Before the formation of strands need to comb your hair well, so as not to stick out.
- Weak weaving will cause it to crawl, on the contrary, if it is tight, it is bad for the hair, and can cause headaches. Ready hairstyle should keep well and not deliver discomfort.
- Need to learn how to take the same strands. So the braid is smooth and looks beautiful. It is convenient to grab the strands with the little fingers of the hands so that the other fingers hold the braid, preventing it from disintegrating.
- If you want to braid yourself, it is better to do it without a mirror. On the contrary, it interferes with focusing, knocks down and is needed only to evaluate the final result.
Simple braid
In childhood, all the girls plaited the usual pigtail. Make it a child even a father can. When clever, this hairstyle takes little time and is suitable for every day. The instruction is quite simple:
- Comb and divide into three equal parts,
- The right strand to throw on the middle, slightly tighten

- Move the left strand in the middle, also throwing it on top,
- To repeat the movements, evenly tightening the strands so as not to break up,
- When the tips will be 5-10 cm, just secure the braid with an elastic band. You can use a ribbon, but it needs to be woven around the middle of the length. The tape is bent in half, it turns out two parts. They are connected to the strands: one with the left, the other with the right. Then weaving continues in the same way, and at the end the ribbon is tied into a knot, if necessary, in a bow.
You can braid a child two braids, or more. In this parting should be smooth, and braids are located at the same height. Especially well look two braids on thick hair. You can start weaving closer to the neck or higher on the back of your head: the appearance of the braid will be different. The bezel from the braid will look beautiful if the length of hair allows.
According to our readers, the most effective hair care product is Hair MegaSpray, a unique spray; famous trichologists and scientists have a hand in its creation. The natural vitamin formula of the spray allows it to be used for all hair types. The product is certified. Beware of fakes.
How to weave a French braid?
Another name for this spit is the spikelet. It is more complicated than simple weaving, but it also looks more spectacular. It is suitable even for short hair up to the chin. You can braid her not only for the girl, but also for yourself: among the variants of her weaving, you can choose the right one for the office, party, outdoor activities.

If you braid tightly (moderately), the spikelet keeps for a long time, keeps its shape under a headdress. Step-by-step instruction:
- Apply mousse to hair so that it disintegrates less.
- Separate the strand on the crown, if you make it thinner, the spit will become thicker towards the neck. If you take more hair, it will be uniform over the entire length.
- The resulting strand should be divided into three equal parts. Subsequent strands do the same size.
- Combine the first three strands as in ordinary weaving: shift the right one onto the middle one, put the left one on top.
- With your left hand hold the left and middle strand. Free hand to separate the strand from the hair on the right side, connect it with the right main weave.
- Weave the obtained strand into a spike according to the principle of ordinary weaving.
- Holding all three strands with your right hand, separate the new strand from the left side with your left hand.
- Connect it with the left strand of the spikelet and shift it to the middle part.
- Continue weaving, grabbing the strands from the bulk of the hair on the right and left side.
- When all the hair will be woven into a braid, you get three strands that can be weaved like a regular pigtail and fixed with rubber bands.
If the principle is clear, the hair does not take much time.
You can experiment, making different variations: start at the very bangs or at the back of the head (the second option is more suitable for an elongated face - it does not create extra volume at the crown).
You can not interweave all the curls, securing a spike on the back of his head, and leave the rest free. For the original hairstyle, braid it in the opposite direction, starting from the back of the head, and fasten the braid on the crown. For convenience, you need to tilt your head down, otherwise the instructions are the same. 
The bead of the French braid looks very beautiful: weaving begins closer to the ear and goes in a circle. The girl can braid a few spikelets or make a small bezel. A difficult option - zigzag spike.It’s not very convenient to do yourself, but it looks original on the girl:
- Make a parting in the upper part of the head from the left ear, almost bringing it to the other, evenly separating part of the hair.
- In the same direction, start weaving a spikelet.
- Reaching the right ear, make a turn, and weave, on the contrary, in the direction of the left ear.
- So repeat several times, depending on the width of the spikelet.
- It turns spike, like a snake.
Danish braid
Such a pigtail resembles a spikelet in reverse. After training, you can weave yourself a Danish pigtail as quickly as the French one. The principle of weaving is the same, but the extreme strands are not placed on the middle one, but on the contrary, under it, on the eversion. The instruction is quite simple: 
- Separate the strand in the upper part of the head, divide it into three equal parts,
- The right side to put under the middle - it is in the middle.
- Send the left strand under the middle one, gently tighten the weave.
- To separate the hair strand on the right side, connect it to the right side of the main weave, direct it under the middle one.
- The same steps to do on the left side.
- Alternately take strands of hair on the sides, not forgetting to pull the whole weave, so that it is uniform and beautiful.
- Combining all the hair in a braid, dock it in the usual way and secure with a rubber band.
A scythe can be twisted into a ring, fastened on the back of the head with pins or invisibles: you will get a peculiar shell. Beautifully look two braids on eversion on the sides. Danish can start from the middle of the forehead, or diagonally from the temple. You can also braid on the contrary from neck to neck, or make a bezel around the head.
Fish tail
An interesting way of weaving for the girl.
To make it easier to weave, it is better to move all the curls on one shoulder - so it happens from the side. Learning is quite simple by following the tutorial: 
- Comb your hair and sprinkle a little with water or a special spray so that they are smooth and less confused.
- Divide the hair in half.
- From the right half to separate a small strand and place under the left half.
- Take the opposite order from the left half and connect to the right, placing it closer to the middle.
- In this way, braid the entire length and secure with a rubber band. It is important to make sure that the strands are the same - it will make an even weave.
The child can braid, starting to take the locks on the sides of the temples. For your own sake, for convenience, you can collect the hair on the back of the head, fasten it with an elastic and start to weave. To make the gum inconspicuous, you can wrap it with a small strand of hair and fix it with stealth or hairpins.
If you straighten the strands and pull them out, it will turn out to be more magnificent. You can braid less to give a hairstyle easy negligence. In this case it is necessary to fix the result with varnish.
How to braid volumetric braid?
There are several ways to make a volumetric braid. To make the braid look voluminous, you need to braid the braid over the top and gently pull the locks slightly to the sides, moving upwards. You can weave into the hair ribbon and form a bezel of them. 
Just braid three pigtails, finishing each simple braid, and then weave one of the three to make it quite voluminous. Thus you can connect the three braids.
Beautiful braid of four strands suitable even for sparse hair. She requires skill, it is difficult to braid herself, but you can learn:
- Divide into 4 strands.
- The first strand to put on the second and stretch under the third.
- 4 put under 1, stretch over 3 above and under 2, fix the position with your hands.
- Repeat this procedure until the end of the hair, fasten with a rubber band.
There is another way to weave in four strands:
- Take a small strand and braid in a regular braid.
- The remaining hair is divided into three parts: you get 4 strands, one of which is a pigtail, let it be the 2nd strand.
- 4 hold under 3 and place over 2.
- 1 put on 4 and stretch under 2.
- 3 hold between 1 and 2.
- 4 put on 3 and stretch under 2.
- Continue weaving according to this scheme, fix it in the end.
If you master the method in 4 strands, it is easy to learn how to make a braid in 5 strands: 
- Comb and slightly moisten the hair with an atomizer to make it easier to handle.
- If weaving itself, for beginners it is more convenient to make the tail and fix it on the back of the head with an elastic band. Over time, you can learn to make a braid without it.
- To divide the mass of hair into 5 equal strands, from the first to the fifth from left to right.
- pull the fifth strand over the third and under the fourth.
- stretch the first strand on top of the third and under the second.
- pull the fifth strand over the fourth and below the third.
- stretch the first strand over the third and under the second.
- Repeat the action according to the scheme, to the desired length, fix the rubber band.
- Extreme strands to pull out so that the spit seemed more voluminous.
Unusual option looks "mermaid's tail":
- Comb the curls, move them to one side and divide into two parts, fasten one at first so as not to interfere.
- To braid two braids is not very tight, fix with rubber bands, and pull out a little strands, so the braids will seem wider.
- Connect pigtails with stealth in one canvas. Such a hairstyle is done rather quickly, and in form resembles a mermaid's tail.
Author: Y. Belyaev
 Spit is the simplest and most common type of hairstyle. Thanks to the diverse types and methods of weaving, braids are very popular. Neatly braided hair is a convenient hairstyle in everyday life, relevant in an office setting and beautiful at a celebration.
To make the hair obedient and easily yielded to weaving and styling, you can use different means in the form of foam, gel or fix uneven strands with hairpins. Also need a good comb.
Weave ordinary braids
The most common and familiar since childhood was the usual pigtail, braided from three strands of hair. Dividing the hair into three parts and observing the sequence, we intertwine the hair, among themselves.
First, the third part is interlaced with the first and second strands, followed by the first with the second and third, and the second with the third and first. It is important to ensure that the strands are tightly pulled together and the hair is not lost. Having finished such a hairstyle, you can use an ordinary elastic band, a beautiful hair clip or weave a ribbon.


Weave two braids
On thick heavy hair, two braids will look cool and original.

On a photo of a hairdress with weaving of two braids
For this hairstyle hair should be divided into two equal parts. Now each of them must be braided in the usual way, it is only important to check that the weaving of both braids starts from the same level.
Weave Spit Spike
Braid pigtail "spike" will be a little harder than usual, but the weaving technique is very similar, so you can cope. Weaving should also begin as with a regular braid, only it is necessary to take not all the hair, but only the upper part and divide them into three equal strands. It is important to evenly distribute the strands so that in the end the braid looks even. Strands start to weave like a regular braid and slowly weave in new small strands of hair from the side of the remaining hair. thus continue to weave the strands in the main braid, until the hairline on the head ends.


Loose hair can be gathered into a ponytail or braided into a regular braid.
If the "spike" turned out to be insufficiently volume, you can slightly fluff it with a comb. "Spike" will last very long in excellent condition, if it is as tight as possible.
Weave Spit Fishtail
Hair combed back and divided into two equal parts. We take each of the strands in hand. Use the index finger of your left hand to select a thin strand of hair (approximately 2.5 cm) from the side and move it to the right side, securing it with your right hand. Then, with the index finger of your right hand, separate the same strand on the right and move it to the left, securing it with your left hand.


We repeat such actions until we reach the end.Tie the end of the braid with a rubber band or decorate with a hairpin.
French braid weave
Comb the hair and separate the part of the hair from the top of the parietal zone. Divide the strand into three equal strands and begin to weave, first putting the left one on the central one, then the right one on the central one. Then put the left strand on the center and add to it the strand on the left. Now put the right strand on the center and add to it a strand of hair on the right.


In the photo weaving a French braid on the side
In this way, add alternately strands in the weaving on the right and left. Loose tail tighten elastic or braid in a regular braid. With the beginning of weaving "French" braids, you can easily experiment. This braid weaving scheme, also suitable for two braids, side French braid and weaving from the temple.
This hairstyle is very convenient for everyday life, having learned to braid the "French" braid, it will become your favorite.


French braid weave from bottom to top
Weaving this braid must begin from the back of the head, moving towards the crown. Use the pattern of weaving an ordinary French braid. Finish hairstyle can be collected ends in a bun or a tail.


Inverted French Spit Weave
Comb your hair. Separate the hair and divide into three equal parts. Place under the center strand, first the right and then the left strand. Put the right part under the center part adding to it a part of the hair on the right. Now put the left under the center, adding to it a part of the hair on the left.


The loose tail can be braided into a simple braid or horse tail. A little stretching the braid, you can make it more voluminous.
Weave Spit Waterfall
Comb the hair into a side parting and begin to weave an ordinary French braid horizontally from the forehead towards the temples. Then put the upper strand on the middle one, separate the small strand from the top and put it on the middle one, while releasing the lower part. Near the abandoned bottom strand of loose hair, separate the small strand and put it on the middle one. We repeat this way each time adding to the top strand an undercover of loose hair, place it on the middle one and release the bottom strand, replacing it with a new one.


Weave braids of 4 and 5 strands
Braiding such a pigtail requires special skill and skill. To begin with, the hair must be combed back and divided into five equal strands. The right strand is crossed with the strand closest to it.
The most central strand is crossed with a strand that was right. Then we cross the central one from its left (not the most extreme one). Now the leftmost cross with the next strand on the right. When braiding, try not to stretch the braid too tight. Now braid the second row by following this pattern. Such actions must be performed until the braid is woven together.

Swiss braid weave
The "Swiss" braid is woven in the same way as our usual three-strand braid, but each strand must be twisted with a braid. This hairstyle looks quite unusual and elegant, so it will be a godsend for both work and leisure.

Weave braids plait
First you need to collect the hair in the tail, then divided into two equal parts. Then twist the right strand of hair in the direction to the right, about 3-4 turns, and firmly hold it with your hand. Do the same with the left strand.
Now you need to carefully cross both strands, making sure that they do not unwind. The ends, as usual, fix tight elastic.


According to the scheme of twisting one braid a plait, you can braid two. To do this, comb your hair on a straight parting, following the pattern twist one part of the hair, then the second. Loose hair can be either twisted together, braided in a braid, and leave loose.


Weave braids "Wreath"
Separate a small section of hair from the temple and divide it into two equal parts. Then wrap the bottom part around the top and connect the strands into one.Now, from the free hair at the bottom, separate the small strands and wrap it around the top double strand. Then continue to weave this way, adding strands of loose hair from the bottom, wrapping around the top strand and connecting them together. Fix the end of the hair with a rubber band and gently hide under the resulting wreath.

Weave braids "Crown"

Weaving "Linno Russo" with ribbon
On the crown of the head, separate a small section of hair and place a ribbon on top of it and cross it. Next, select the strand below the previous divide into two parts and wrap each ends of the tape, so that the strands are at the bottom of the hair, and the tape on top. Then again add strands of loose hair, separating them with a horizontal parting. We fix the resulting braid by tying the ribbon; you can also add extra volume to the braid by slightly stretching the strands.


Spit of knots
It is very easy to make a braid from knots, and it will look elegant and neat. Separate the upper part of the hair and divide into two parts. Tie these parts together from right to left or vice versa (Fig. 1) as a normal knot. Further to the remaining free edges of the hair, add along the strands and then re-tie the knot, do so until all the hair is woven together. The end of the braid can be fixed with a rubber band and turned to the bottom.


Weaving Spit "Bantik"
This weaving is rather an ornament of an already woven braid, making it quite simple. To begin with, it is necessary to braid the braid, leaving a thin strand of hair parallel to it; it is from this that you will later form bows. After the braid is braided, from the loose hair left for the bow, we separate a small strand and sprinkle it with plenty of hairspray, then bend it in half to form an eyelet. Carefully thread the eyelet with a stud under the braid, holding it with your hand.


Weave braids "Snake"
Separate the top strand of hair from the side and divide into three equal parts. Begin to weave the usual French braid with the addition of strands only on top. When braiding, you should lead the pigtail along an inclined one, bring the weaving to the temple and make a turn of the braid weave the braid further adding the strand still above, ignoring the bottom. If you have long hair, you can make turns along the entire length, it depends on the desire. Braiding the lowermost braid, hair pickup is already done from the bottom and top. The ends of the hair can be woven into a braid or left free.

Weaving braids "basket"
At the crown, select the hair area and collect them in a high tail. From the weighting we start to whip the usual French braid, each time adding to the right strands of loose hair, and to the left of the tail, you need to take them so thick that it is enough for all the weaving. Thus weave around. Having reached the place of the beginning of weaving, we begin to weave an ordinary braid. We fix the end with an elastic band and hide it under the base of the tail, for greater fixation of the hairstyle it can also be fixed with invisible hair.


Weaving Spit "Snail"
We separate a small strand from the middle of the head and divide it into three equal ones. Then we begin to weave the usual French braid but with one pickup on the right. At the beginning it is important to take small strands so that the hair is enough for the subsequent circles. Next, weave a braid across the head, moving in a circle. Hair tip gently fix and mask under the barrette.

Weaving Spit "Flower"
To create a flower from the hair, you need to braid a regular braid, but only to whip it should not be up, but down (an inverted braid), it should be weighed too tightly.
Next, slightly stretch the resulting braid and turn it into its ends. Spread the resulting flower and decorate with accessories if desired.


Hairstyle weaving "Butterfly"


 Pigtails - an attractive hairstyle for different occasions. They exist in different versions, differing in weaving technique. For each girl there are braids that will be best suited for her. They are more suitable for medium and long hair. If they are short, then use the method of building.
When there is no time for complex styling, you can perform simple beautiful hairstyles. Step-by-step tutorial for all braids: you need to familiarize yourself with simple rules on how to quickly and simply learn how to create braids. They can be braided both for small children and adults.
Peculiarities of weaving ordinary braids
 You can learn how to braid braids step by step through a simple master class. They are the basis, after which it becomes possible to create complex types of weaving. Such beautiful pigtails are created quickly. They can be done both by children and themselves.
- Hair must be carefully combed and divided into 3 parts.
- With your left hand you need to grab the left strand and throw over the middle one. The same action is performed with the right strand.
- We weave a pigtail further and fasten with a rubber band.
Beautiful braids look, braided on the sides. It is necessary to create a smooth parting, and it is inconvenient to do it yourself. Better to have an assistant do it. This option is suitable for a child in school or kindergarten.

Step by step you can learn how to braid beautiful pigtails "Little Dragon". They are made to children in school, for holidays and for everyday life. These braids exist in several versions: in the vertical direction, horizontal, obliquely. To perform the need to observe the stages of work:
- It is necessary to visualize the line, parallel to which weaving is performed.
- Then the hair should be combed. It is necessary to take a strand and divide it into 3 parts.
- To make it easier to braid, it is necessary to number the strands: 1 is placed between 2 and 3, 3 between 2 and 1, 2 between 1 and 3.
- Then the tail is woven into a bunch, borrowed from 1 strand. As a result, weaving continues, curls are collected from two sides. It turns out a great braid.
Work must be neat and tidy. At the end it is necessary to fasten the hair with a rubber band or barrette.
There is a step by step guide for getting attractive “French braids”. Braid beautiful "French" braids can be in various versions. Recently, there are more and more options, but first you need to learn how to make classic weaving. The French braid is suitable for both a child and a girl.
- First you need to comb your hair well. Then the strand is separated from the forehead and secured with an elastic band.
- On both sides you need to take 2 strands. The technique is somewhat complicated, because you have to work with 4 strands. It is better to do the work of the master class to get the desired result.
- You will need to tighten curls well.
African weaving

Very popular beautiful African braids, which can also be learned to braid yourself. This hairstyle is loved all over the world, but they are traditional among the inhabitants of the desert continent. Hairstyle making is difficult and the master does the job better. If you still want to do it yourself, then you must adhere to the basic rules of creation.
- Since all hairs are used in the hairstyle, it is necessary to divide them into equal strands of 10-15 mm.
- Of all the strands braid pigtails, which are thin.
- In order for the hairstyle to be even, it is necessary that the pigtails be directed towards each other in a horizontal direction.
- Braid pigtails need to face, then do not immediately carry out the separation. It is advisable to perform a horizontal parting, which is further divided into parts.
To braid African braids for a long time, since you have to process about 400 strands. Some make extensions for this, because of what they draw and other strands. With such braids you can learn to do other hairstyles.
For long hair, you can learn how to braid beautiful pigtails in the Danish style. They are similar to the "spike", only created in the opposite direction.
- Hair is collected on the back of the head and divided into 3 parts.
- The left strand is placed under the middle one. Also, actions are performed on the right side.
- While the curls are in the right hand, with the help of the left hand a small strand is connected to the side with the left oblique.
- To get a beautiful hairstyle, you must take strands of 3 cm. The left strand is enclosed under the middle one and woven into the left side.
- When the curls are in the left hand, the right one is created, the braid is created, and the braid must be pulled in the other direction.
- In the process, you need to change hands.
- When the spot comes, the weave of the left strand begins with the middle, the right with the middle. The result was a beautiful hairstyle for all occasions. This option is suitable for everyone, including the child.
 The hair is divided into 3 parts. At the beginning, a regular braid is woven, and with 3 weaves, the work changes. From the sides, 2 strands are picked up, after which they are woven into curls on their side.
Then another part of the hairstyle is woven. To avoid a messy look, you need to make a pile and use a massage brush to style it. The standard hairstyle "Spikelet" is perfect for a child.
This hairstyle is great for straight and curly hair. They gather, and braid spins from the temple from one side to the other. So you can create 2 braids on both sides, and fasten the tips with studs. The remaining curls can be loose or in the form of "spike". We need to start weaving from the place near the ear, and the ending will be on the opposite side.
Hairstyles for short hair

Original styling is obtained not only with long and medium hair. To the bob and bob fit hairstyle "French Falls". 2 braids are woven all over the head, and in the central part they are held together in the tail.
“Spike” is also suitable for short hair, only strands should be more than 15 cm. If the curls are short, then artificial hair strands are used to create original hairstyles. Thanks to them, the hair will be thicker, besides it is very easy to do work with them. If the hair is about 4 cm, then African braids will do.
- To hair seemed thick, you need to braid a free braid.
- It is convenient to work with thin strands with a sharp part of a comb. They refuel better.
- To improve the volume, you can use the technology of creating artificial strands.
- The usual braid will be much more beautiful if you create it zigzag.
- Straight and thick curls can be made in the form of a rope. So they will look more original.
- Strands must be assembled parallel to the braid, and then a neat hairstyle will be ready.
To fix the braids used varnishes, gels and mousses. Spit turns out better if it took several days after washing your hair. Before work the hair is carefully combed. Any hairstyle will look attractive if the hair is tidy, and this requires daily care. It is recommended to constantly use medical masks and shampoos. In this case, even the usual pigtail will look neat.
Weaving spikelet on the sides
Simple knitting requires a good effort to braids for a long time kept in its original form. Therefore, two braids "spike" on the sides should be woven with well-combed locks.
Step 1. Thin scallop to split the hair into two parts evenly parted. While one side is braided, it is necessary to stab the second with clips so that the hair does not interfere with the work.
Step 2. The left parting should be divided into two parts.
Step 3. Weaving begins with two strands that lie cross-on-top of each other, while it is important to support the middle of the weave with your thumb. Continuing to weave a spikelet, you need to grab small strands from each part, while weaving is carried strictly inside the pigtails.
Important! During weaving, it is necessary to try to tighten each strand as much as possible so that at the very end you can give a spikelet a tracery. A well-tightened pigtail will last on the model from several hours to a whole day.
Step 4. Fasten the pigtail with small hairpins or pins so that the hair near the back of the head does not break up.
Step 5. We give openwork.Each strand, starting from the top, you need to slightly release forward, slowly moving up to the latest strands, while gently supporting the tip of the spikelet. Repeat on the other side, then fix it with varnish.

Unusual hairstyle. Spit harnesses on the sides
So, how to braid two braids on the sides, so that they look original and beautiful?
Step 1. Divide the hair in a vertical parting into two parts, while combing each side well. One part needs to be fixed with a barrette, and on the second part, make a high horse's tail on its side and tighten with a tight elastic band.
Step 2. The tail is also divided into two parts. We twist the light harnesses of the parts so that the hair is tightly twisted, but it does not curl into a spring. Carefully supporting, the harnesses must be braided, like ordinary braids, and fastened with a rubber band for the hair.
Step 3. Repeat the steps on the other side. Secure with varnish.

Two braids, tails
When a girl asks a question: how to braid two braids on each side independently, the image of a beautiful French braid always comes, but often not everyone can independently make even, neat and identical braids, so you can resort to lighter options that will give romance and playfulness to the image.
So, we will weave two braids on the sides according to the following algorithm:
Step 1. Make a flat vertical parting, fasten one part with a barrette. Those who want diversity can be made instead of a vertical zigzag parting.
Step 2. Gather a tight high tail. It is important that the tail is taut. After that, divide it into two parts. Begin to weave a spikelet so that the strands go from the bottom up.
Step 3. Carefully supporting the tip of the finished pigtail, start slightly releasing the strands all over the spikelet so that you get a beautiful openwork. Tie the pigtail gently with a tight elastic band or barrette.
Step 4. Repeat with the other side. Secure with varnish.

Newbie Advice
Those who are just learning to weave two braids on the sides, you need to remember that you should not move on to the first stages of training to complex techniques. To make the braids even, dense and beautiful, time, practice and technique of honed hand movements are needed, and all this can be achieved only with the help of constant attempts to weave light pigtails, such as a spikelet, a fish tail or a Russian braid.
Russian braid - an easy option for everyday hairstyles, as well as for beginners
Two braids on the sides can still braid as follows:
Step 1. Evenly distribute the hair in two parts with a vertical parting. Put one side aside and stab the barrette.
Step 2. Divide one side into three parts, while counting the strands from left to right.
Step 3. Strand No. 1 passes between No. 2 and No. 3, then Strand No. 3 passes between No. 2 and No. 1, and then Strand No. 2 passes between No. 1 and No. 3. Continue weaving along the entire length. Repeat on the other side.
Step 4. Secure the tip of one braid with a hairpin or invisible at the base of the second braid and vice versa. Fix the hair with lacquer.

Pair fishtail
Two pigtails on the sides for long hair will be an excellent output option that even a novice can braid. This hairstyle, although it requires tight weaving, but it looks very elegant and amazing. The image will resemble a real Mermaid from fairy tales.
So, to braid two braids on the sides of the long, you need to act according to the following plan:
Step 1. Carefully combing, hair should be divided into two parts using a vertical parting. To keep the pigtail for a long time, you can fasten it around the base with a thin, tight elastic band. It is important to remember that one part must be stabbed with a barrette while one side is woven, so that the hair does not interfere with the work.
Step 2. Weaving should be based on very thin strands, so the fishtail braid refers to hairstyles that require long work and patience.Next, you need to take a strand on the right side of the tail and throw it to the left, repeat the opposite: take a strand on the left side and throw to the right. Repeat the action along the entire length of the hair.
Tip! To prevent the fishtail from spreading during the day, it is necessary to tighten the strands as tightly as possible, and fix the base of the pigtail with a thin and tight elastic band. Then you can go to the other side and fix hairspray.

A few rules to follow when weaving braids
To beautifully braid two braids on the sides, you need to listen to the following tips:
- Before you start weaving, you need to comb your hair well. If they are not thick, then the problem in the invention of hairstyles at a modest length does not arise, but for long hair you need to comb each strand separately. With thick curls, for convenience, each strand can be fastened with hairpins so that they do not interfere with weaving.
- Do not braid pigtails on wet hair. Firstly, it severely injures them along the entire length. Secondly, during the weaving there will be discomfort, as wet hair will constantly stick to the hand.
- You need to start weaving with lighter patterns, and then go on to complex hairstyles. Good pigtails require established dexterity and great patience.

Pigtail waterfall. 5 minutes and you're done
Step 1. Spread the hair in a vertical parting in two. Comb each side well to keep your hair smooth. If they are naturally wavy, then it’s best to start with a rectifier.
Tip! Pigtail-waterfall, although it does not require a long time for weaving, but, however, to keep the hairstyle long, you need to be well prepared. For example, before you start weaving, you can apply a small amount of hair styling to your hair, but not lacquer! The lacquer only fixes the already finished hairstyle, and the styling tool (spray, mousse) will help to make the hairstyle neat and durable from the first stages of weaving.
Step 2. It is good to comb the strand near the temple and divide it into three parts in order to start weaving the classic Russian braid. Weaving should reach exactly to parting.
Step 3. With each spit weaving, it is necessary to add a thin strand from the top of the crown so that it passes through and gives the impression of a falling waterfall.
Step 4. As soon as the pigtail is ready, you need to fix it with a thin rubber band near the parting and the invisible ones, and then repeat the actions on the other side.
Step 5. Fix the hair with lacquer.

Simple braid or french? Better all together
A great option for long hair for every day, where two types of braids intertwine with each other into a single whole.
Step 1. Divide the hair into two parts. We do not touch one side yet, but only fasten it with a barrette.
Step 2. We divide the small strand around the face into three parts and begin to weave a vertical pigtail, periodically adding thin strands. Once the pigtail is ready, you need to fix it with an elastic band.
Step 3. The remaining hair is divided into three parts and continue to weave the classic Russian braid, and then again it needs to be fixed with a rubber band and fixed with varnish.
Tip! It is possible to release several strands from the combined pigtail, giving chaos and carelessness to the image.
Hair "Two braids on the sides" will be the original version for every day. She will cause admiration and envy of others!
Top 10 french braids hairstyles

 In this article, we suggest that you familiarize yourself with various hairstyles, which are based on the French braid. At first glance it may seem that even a classic braid is quite difficult to perform, and a hairstyle from a braid is even more so.
However, this is a profound error! Choose a few options that seemed to you the most cute, and then feel free to start experimenting! A little practice - and it will turn out to create an unimaginable beauty on your hair! The braid itself is a great option for every day, besides it fits any style. Dressing in a discreet business style, you can gently fold a bunch of braids on the back of your head or on the side, and casual casual will look great if you choose a disheveled version of the French braid.
Consider the type of your hair.For example, owners of thin and not too thick hair can opt for large braids. Before weaving the hair you need to slightly comb it, but in the end, use the method of pulling apart the strands - this will create a larger volume. For girls with thick hair, we recommend thinner braids - you will get the effect of some lightness and lightness of hair that looks fresh and feminine. Moreover, if you do not have long hair, then you should not give up braids. Medium length curls can be easily braided into a beautiful French braid. If you are the owner of short hair, then do not rush to get upset. Spit weaving allows the use of additional artificial or natural patch strands. Independently to do this is not very easy, so you should contact a professional.
So, we will proceed to the description of the technique of weaving classical French braids.
- Comb all your hair back. Separate at the crown one wide strand, which is then divided into three equal parts. The wider the strands, the larger the spit will be.
- The right strand is thrown over the center - now the right strand is between the left and the center. The same must be done with the left strand. We throw it over the strand with which we have just worked. In other words, we started weaving an ordinary braid.
- Now we continue on the same principle, but weaving in additional strands that we take from the temple.
Below are the pictures that will help you understand this simple technique of weaving a classic French braid.
We advise you to try to weave such a braid on a diagonal, starting weaving from the side and leading it down diagonally. You can leave the end of a pigtail free or tie it in a bun.
Having mastered the skill of weaving a classic French braid, you can begin to weave hairstyles, which are based on this braid.
Absolutely simple hairstyle, but it looks neat and elegant. You can wear such a braid with a strict business suit - thus you dilute the restraint of the image, it will be easier and more interesting. This braid will look good with a light summer dress if you add accessories to your hair - for example, interesting hairpins, studs with rhinestones and so on.
We braid the classic French braid, the end of which is turned inward and fastened with invisible studs in several places.
This hairstyle looks elegant and elegant, so you can choose it if you are going to a solemn event. You can not use accessories, so as not to overload the image.
However, if the hairstyle seems too "dry", you can dream up and dilute the image with bright hairpins or ribbons.
The weaving technique differs from the weaving technique of the classic French braid only in that it is performed in the opposite direction:
- We comb the hair in the direction from the head to the top. We select a wide strand on the back of the head, which we then divide into three equal parts and begin to weave the classic French braid to the border of the back of the head.
- Having finished this stage, tuck the end of the braid and tie a bunch. Wrap the remaining hair tip around the bundle and carefully fasten it all with invisible pins.
- The front part of the hair, which we did not use, can now be laid with a wave on the forehead and then twisted around the bundle. However, here you can show imagination and try different ways of laying the remaining strand - it depends on what effect you want to achieve.
Now it's up to the accessories, but make sure that there are not too many. One bright ribbon or string of pearls will be quite enough.
The most discreet casual outfit will be interesting if you make such a braid.
In addition, she perfectly beat the evening outfit and even suitable for high-profile events. This hairstyle looks very unusual, but make it pretty simple.The principle of weaving is the same as that of the classic French braid, but there are some nuances.
In the case of the classic French oblique strands are placed on top of each other, and to create a voluminous braid, they pass under each other. You can add volume to a hairstyle in such a simple way: gently pull each strand of your braid in the direction from its end to the base.
You can experiment by starting to weave a braid on the side or by making two pigtails, which are then reduced to one, or you can try weaving several parallel braids!
Universal hairstyle that will look great regardless of hair type.
It will complement the sophisticated evening dress and will play wonderfully in tandem with a simple daytime - it all depends on how tight the weave is and on the accessories with which you will dilute the hairstyle.
You can start weaving from the side or in the center of the head - as you please.
- Divide the hair into two equal parts, but do it so that parting does not form.
- Take a thin strand of hair from below from any part and move it in the opposite direction, as if hugging a section of hair.
- Do the same with the other part. Continue weaving until the spit is over. For a larger volume, use the method of "pulling apart" strands, which is better to carry out from the bottom up.
A relatively new type of braid weaving, which came into fashion just a few years ago and has already managed to win recognition among stylists and simply fashionistas.
A warm spring day or a fresh evening, a hot summer or a cool, cool autumn - the French waterfall spit will always look beautiful and appropriate.
Create a hairstyle is easy.
- Weaving begins with the area of bangs on the technique of performing a classic French braid. A strand of hair is taken, divided into three equal parts, which are woven into a French pigtail to the ear.
- Then proceed directly to the weaving of the waterfall spit. You have three strands: right, middle and left. Continuing weaving, you bind the left strand with the middle one, passing the right strand down between them.
This hairstyle looks romantic, gentle and elegant, so you should work on the image to achieve harmony.
Most effectively, this option of weaving a braid will look if you wear a light dress made of flowing fabric.
Also openwork blouses and loose skirts will do. In this case, should make the hair more voluminous. To do this, first wind the hair on the curlers, and then start weaving. If you want to create a luxurious look that is ideal for a festive event, then by all means rely on accessories that will complement your hairstyle.
These can be contrast ribbons or vintage hairpins. The hair in this embodiment is best left smooth and even, and not to twist on the curlers. It all depends on your desires and fantasy.
On the basis of the French braid, many small braids can be braided. Seeing this hairstyle, I immediately recall the seashore of some exotic country.
In the implementation of hairstyles there are no tricks and difficulties.
Divide the hair at the crown and temples on smooth tracks and braid French pigtails to the back of the head. Remember that in this weaving braids should fit very tightly to the scalp - thanks to this, you have the opportunity to give the pigtails an interesting direction - for example, to make a pattern with a zigzag, wave or herringbone.
You can fasten all the hair in the tail, and curl the tail with a curling iron or a hair dryer.
The proposed options are the main hairstyles that can be created on the basis of the classic French braid, however, we offer you a few more options that motivate you to create your unique image and include fantasy.
This is a graceful and very romantic hairstyle.Suitable for high-profile events, and to meet with your chosen one.
- Parting is done in the center of the head. On each side a small part of the hair is separated, from which the bows will be formed a little later. It will be enough to separate by 2 cm.
- From the remaining hair weaves a classic French braid.
- Then the hair is taken from the previously separated strands and looped through the pigtail.
Strict option hairstyles, and therefore ideally complement the image of a business lady.
- Parting is done on the side.
- From the temples are woven two classic French braids, which are then woven into one on the back of the head. However, the two braids trudge differently. One braid is woven by adding strands on one side only, and the other braid by adding strands on both sides. Strands are added thin, and weaving is tight.
- Then this braid is twisted into a ball and fastened with invisible pins.
Another universal hairstyle that will successfully complement any of your images - from a strict business to a flirty.
From the tails on the sides weave two ordinary pigtails, and between them is one French. I can not even believe that such an elegant, elegant and spectacular hairstyle is created in such a simple way! The main thing is to correctly use the very braids.
Looks great in addition to the casual style. Suitable for business.
Two braids are braided, which are then placed in a ball in such a way that the parting is not closed, thanks to which a wave-like pattern is created. The hairstyle is universal in that it can be done on hair of any type and length.
Be always fresh and original, create new images, delight those around you with their beauty and good mood!
Fashionable braids: 6 popular techniques of weaving itself

Author Oksana Knopa date May 27, 2016
Changeable fashion allows girls to choose almost any hairstyle. If there is a need to remove the hair, then this can be done both with the help of an elastic band and by gathering curls into a braid. Their variety allows you to choose the right hairstyle for any occasion - a romantic meeting, business talk or even a wedding.
You can spit the braid yourself, the main thing is to know all the nuances
Types of braids: Russian braid on hair - ideal for beginners
Beautiful braids have always been a symbol of women in Russia. Braiding the braid itself is an excellent job. The easiest way to learn how to braid exactly Russian braid. To braid a beautiful braid, you must perform the following steps:
- gently comb your hair
- divide them into 3 equal parts,
- hold the right strand with your right hand, and the left with your left
- alternately through the middle strand shift the left and right strands,
- do the movements until the hair runs out, fasten them together.
To better understand how to weave a braid, take a look at the attached diagram.
Beautiful braids: "dragon"
Braided braid "dragon" looks very impressive, but its implementation does not take much time. However, there are some rules:
- hair must be clean
- Use a special foam or mousse for styling.
The execution scheme is as follows:
- Hair combed and with insufficient volume additionally combed with a comb.
- A small part of the hair from the forehead area is divided into 3 equal parts, we begin to weave a spikelet.
- Gradually add side strands, fix them in a braid and make sure not to leave the hair hanging free.
- When the strands are over, fasten the braid with an elastic band.
- To add extra volume, gently pull the strands.
- Fix the fixing agent (varnish).
To learn how to do the "dragon", see the photo below.
Types of braids: French braids (a pigtail cone), like weaving a fish braid
To learn how to weave pigtails, follow the simple rules. By the way, the fish, the French and the spikelet have the same technique.So, weaving these braids with enough experience will take no more than 5-10 minutes.
Before performing the hair strands must be well combed and moistened, for example, with foam or mousse.
If the hair in the bangs is shorter, but will be woven, a thin elastic band of a neutral color is additionally taken.
Weaving option of the French braid:
- Moving from top to bottom, we take small strands from the left, then from the right side and throw them over the tail.
- We collect in a braid all loose hair.
- When the thickness is not enough, we end up like a regular pigtail.
- We fasten hair, if desired, you can additionally spray a little varnish.
More information can be taken from the photo.
Simple types of braids: waterfall
Only at first glance a pigtail waterfall looks very difficult. If you wish, even a schoolgirl will be able to learn how to do it! The main advantages of this hairstyle is that it can be used on hair of various lengths (even in the square) and any volume. In the case of insufficient volume, the hair is still better to pre-comb.
Spit-waterfall can be performed in one of the following options:
- from one temple to another,
- turning into a regular braid,
- with both nape and connected in the center,
- 2 parallel braids (one under the other).
Before you start, you must very well comb your hair and get rid of any nodules. The technique is as follows:
- Take three locks in the area of the temple.
- Begin to weave the usual pigtail (make 2-3 full covers).
- Take the upper curl and put it in the center, then the lower curl also shift to the center.
- Further, the strand, which was at the bottom, remains and does not fall into the braid. Instead, it is necessary to take a small lock of hair below the braid.
- To the upper curl add some loose hair that was on top.
- We perform the same actions until we are at the opposite side.
- Fasten the hair with a small hairpin or pins.
- Additionally fix varnish.
Additional information can always be taken from a photo or video on the Internet.
How to weave light braids from 4 strands
Looking for the first time at the 4-strand pigtail creation scheme, you can get confused and decide that it is very difficult to execute it. However, there is a little trick that can help to perceive this information easier.
It turns out that to braid your hair like this, you only need to weave a braid usually (as from 3 curls), and 4 should be placed under the rightmost strand.
Before making hair, hair should be washed, dried and further processed with mousse or foam.
More scheme is as follows:
- We divide the hair into 4 parts, mentally allocate for each serial number.
- Curl number 3 put on the number 2, hold under the number 1.
- Curl number 2 put on top of the number 4.
- Curl number 4 should be between the number 2 and number 3, for this we put it on the number 1.
- Curl number 2 is under the number 1, put on the number 3.
- Further we continue according to the specified scheme to the end.
For detailed acquaintance with the technique of weaving a spit of 4 strands, it is better to get acquainted with the video and master classes on the Internet.
African braids - exotic or fashionable hairstyle
A decade ago, African braids seemed unacceptable: vulgar, challenging. Today the situation has changed, and it is fashionable and prestigious to walk with such scythes, since such a service in a beauty salon is worth a lot of money.
However, having familiarized with the types and techniques of creation, you can experiment with your appearance and make such a haircut even at home.
It is necessary to remember only that in addition to natural strands, it is worthwhile to take care of the preliminary purchase of special synthetic threads that are attached to the hair, give additional volume and come in various colors.
African braids plaiting is not easy, but you can learn
- classic of 3 curls,
- braid braids (made using the spikelet technique), adjacent to the scalp,
- Pony tail is a kind of classic, but with loose long tips,
- dreadlocks - braids made of artificial material, which are attached to natural,
- plaits - thick braids, obtained from 2 strands due to twisting.
Technology for obtaining afrokos at home:
- Carefully comb your hair. It is better not to wash the head for 2 days or to additionally treat it with gel or mousse.
- Divide hair into even partings.
- In the occipital region, take a small amount of hair, comb it, attach a synthetic thread close to the roots, braid a tight pigtail of 3 parts.
- Fix the end with a rubber band or special glue.
All materials are provided for review. Before using recommendations concerning the health of your hair, we recommend that you consult with a specialist. Use of material is permitted only with the active hyperlink to the site.
How to weave a fishtail, two braids, weaving hairstyles with an elastic step by step, the tail on the contrary, photo, video


How to weave a fishtail, many fashionable women know. Beautiful hairstyle is popular because of the originality and festivity of many young girls.
It is stylish, does not hurt the hair and keeps its shape well, has many options for performance, suitable for any occasion: for every day, and for a festive event.
Even if such a spit is a little ragged, slight negligence will not hurt her.
What is the difference between weaving the French braid itself and another person?
It is much easier to braid a French braid to another person than to oneself: the process of weaving is completely visible, if necessary, mistakes are easy to fix, hands are in a comfortable position and do not get tired. Making your hair out of braids yourself is not an easy task. It will require attention and some practice.
Weaving devices
For weaving a french braid, such tools and tools will be needed:
- comb with fine teeth and a pointed handle for easy separation of the strands,
- combing brush for combing
- clips, tapes, rubber bands,
- hairpins, stealth braids,
- lacquer and hair wax to secure the finished hair.
How to weave a French braid?
Recommendations to facilitate weaving braids:
- braiding clean, slightly damp hair is recommended;
- unruly hair moisturize and apply fixatives,
- all tools and materials are prepared in advance and are located in close proximity,
- hair carefully combed

- selected strands should be equal in thickness,
- in the course of work it is necessary to monitor the uniform tension of the strands.

Scheme weaving classic French braids
The French braid (how to weave in the classic version will be discussed in this section) is based on the execution of the braid.
Step-by-step reconstruction of the weave pattern of an ordinary braid:
- Hair combed and divided into 3 identical thick strands. Extreme strands are taken in hand, the average free.
- The right strand is placed on the middle. The middle strand of hair now becomes extreme and is held by the left hand.
- The left strand is located on the middle and is held by the right hand. There was a complete re-crossing of the strands.
- Then repeat the manipulation from the beginning: the side strands are alternately stacked on the center.
- Pulling the braid to the desired length, pull off the rubber band. Not woven hair comb.

French braid with hooks weave like this:
- Highlight a significant strand of hair on the parietal part. Share equally.
- Make 2 weaves as described in the previous description.
- Then begin to weave the side strands in turn at each edge and one for each weave.
- Continue this alternation until all the hair does not fall into the hair.
- Now you can fix the braid with a rubber band or continue weaving to the ends of the hair with the classical method.
Independent weaving backspit
To weave a french braid, on the contrary, you will need:
Technique:
- Hair combed and slightly moistened with water.
- On the parietal part of the head, select a small strand and divide by 3.
 How to weave a French who on the contrary is indicated in this scheme.
Spit on its side
Braid, braided on the side - a great hairstyle for those who like to collect hair.
Suitable for owners of long hair and hair of medium length.
The order of execution:
- Hair combed, lightly moistened with water or applied for styling (mousse, gel).
- Striking hair on the side.

- Gather hair from the parietal part of the head into a large strand and divide into 3 parts.
- When weaving pick up the rest of the hair.
- When the braid is ready, loosen the strands, it will add additional volume to the hairstyle.
- Sprinkle with varnish.

French Spit Falls - the original evening hairstyle with many options.
Especially suitable for thin, devoid of volume, hair.
Creating a spit in one direction:
- Comb your hair, mark the parting.
- To isolate a hair curl from the front of the head, to start weaving a simple braid, but with each crossing the bottom strand is released and replaced with a new one taken from above.
- Twist braid desired length.
 Spit-waterfall from 2 sides weaves like this:
- Hair combed, separated.
- According to the previous description, the 1st braid is performed, on the back of the head it is tightened with an elastic band.
- The 2nd braid weaves symmetrically the 1st from the opposite side of the head.
- The braids are fixed with one rubber band on the back of the head.
Rotated
Inverted braid looks luxuriant than a simple braid.
As a hairstyle is ideal for thin hair, weaves according to the scheme:
- There is a slight order, divided by 3.
- The braid weaves according to the standard braid method, only the extreme strands do not overlap the central curl, but are located under it.
- Loose hair gradually weave into her hair.
- When all the hair will be involved continue to weave the reverse braid.
- On the loose ends wear a rubber band.
Openwork braid of gum
The braids woven with elastic bands are very simple in design. The secret is that the tiers of the weave are fixed with an elastic band. This braid keeps its shape for a long time.
Openwork braid of gum looks amazing on long hair.
Operating procedure:
- Comb hair combed into a tail.
- Extreme strands tie a rubber band, slightly stretch.
- Again connect the extreme strands and fix.
- The actions are repeated until the end of weaving.
The French braid (how to weave in the bulk version, will be analyzed further) can be located in the middle, on the side or braided diagonally. Weave is recommended by the method of inverted braids.
Step-by-step execution:
- The first work order is selected and divided in equal parts.
- Weaving inverted braid with pickup side curls. Extreme strands fall under the middle. Unalloyed hair picked up and woven into her hair.
- When the braid will reach the final, secure with a rubber band.
- Gently pull the edges of the twisted strands.
French ribbon braid - original festive and everyday hairstyle. In order to braid a french braid with a ribbon, you need to separate the working strand by a horizontal parting. Attach the tape folded in half over the part of the invisible. The working strand is divided by 3. Proceed to weaving the inverted braid.
The tape is located between the strands. The strand closest to the center lies under the tape. The extreme strand goes under the bottom, loose hair is added to it.The tape goes under the bottom. Repeat the sequence of actions on the other hand. Essentially 2 back braids are woven at the same time. In the same order weave a braid without the inclusion of strands.
The French braid (like weaving in the fantasy zigzag version, to be described in this paragraph) has many interesting varieties. At first hair combed and designate a parting from a side. Weaving starts from the temple and goes in a horizontal direction. The initial strand is divided by 3. In the course of work, loose hair is gripped exclusively from above.
Bringing work to the opposite side of the head, the braid is turned and continues to weave in the opposite direction. Continue to weave in the same way until the end. Fasten loose ends with a barrette. The longer the hair, the more zigzags.
Into the French braid, the hair of the bangs is braided, the rest of the hair remains unused.
Hair looks elegant and elementary in the creation.
The working strand is separated from the side of the forehead, the remaining hair is collected in the tail. Dedicated strand of hair braided in a classic french braid. Weave braids continue to the opposite ear. The end of the braid is slaughtered stealth and hides under her hair.
Spit in the style of weaving a French spit performed according to the following description:
- Hair combed and halved vertical parting.

- Allocate 2 thin strands near the central zone of the forehead, crisscross (left strand is located under the right).
- On the left side one more strand is separated and intersects with the upper strand of the braid, do the same on the right.
- This procedure is repeated until the interweaving of all hair.
- Reaching to the neck, continue to weave the spikelet: the hair is divided into 2 equal parts, on the outside of each half the extreme strands are spread and attached to the hair of the opposite part on the inside. Watch that all strands are the same in thickness.

The French braid in the Spike variant is suitable for women of any age, comfortable in weaving.
Step-by-step scheme: how to weave a classic fish tail
There are two main techniques of weaving a fishtail spit - with and without pick-up. The first usually starts from the top of the head, the second closer to the back of the head. Weaving with a grip is a bit more complicated, but with him the hairstyle is held tighter.
General rules for creating such a hairstyle:
- Before weaving a fishtail, hair must be carefully combed.
- When weaving strands pressed to the head, sometimes slightly pulling down.
- Strands must be the same thickness.
- The thinner the strands are, the tighter the braid will be.
How to weave a fishtailwith pickup:
- On the parietal part of the head, three strands are separated and intersected with each other 1 time, as when weaving an ordinary braid.
- In this way, two strands are obtained: the upper and lower of the three form one part of the future braid, and the strand between them is the second.
- From the outer part of the strand, which was at the bottom, a thin strand is separated, to which a part of loose hair is added on the same side. The formed common strand is tossed from above to the other side and joined with the opposite strand of hair. At the same time it is taken in and down.
- Now, from the opposite side, two narrow strands are also separated — one from the already formed, and the second from the free hair — and in a similar way intersect it with the already existing strands.
- When all the loose hair will be collected in a braid, you can fix the hair or continue weaving. To do this, thin strands are separated from the outer edge of the braid and alternately spread to the opposite side.
Weaving spikelet without pickup:
- Hair is divided into two equal parts. If neat styling is required, it is necessary to make a clear parting. For a more casual option, just spread your arms in half.
- After that, a thin strand is taken from the upper outer edge at the level of the temple, which must be held over the separated half and brought under the other.
- Then, in the same way, a strand is woven from the opposite side.
- Thus, the locks are successively interlaced to the desired length, after which the end of the braid is fixed with an elastic band.
Ponytail fishtail horsetail, weaving scheme
A fishtail can be braided not only on loose hair, but also after collecting hair in a ponytail.
This option has several advantages:
- if a smooth cushioning is required, this is easier to achieve,
- this braid is easier to braid, especially on long and thick hair,
- This method reduces the length of the braid, which is important in cases where it is necessary to open the neck and shoulders.
Weaving a spike from a ponytail is similar to the process of classical weaving without a pickup:
- hair is divided into two parts
- from the outside, fine strands are separated alternately and successively spread to the opposite side,
- The tip of the braid is fixed with a rubber band.
Options spit fish tail with flowing hair, photo instruction
If you do not want to completely remove the hair in your hair, you can braid a fishtail on the half-distended hair. In this case, only part of the hair is taken into the braid - either strands from the sides to open the face, or from the crown.
In the first version, the braid will serve as a kind of rim under which loose hair will be hidden. This hairstyle will allow you to save the ease of loose hair and at the same time will not allow them to be tattered.
In the second case, the braid will lie on top and only hair in the area of the temples will be fixed. In the second case, for ease of styling, hair can also be pre-assembled into a ponytail and fastened with an elastic band.
If the braid is woven of two strands, taken from the temples, then each of them is pre-twisted into a loose braid. Both bundles are connected in the region of the neck in one strand, after which they begin to weave a fishtail from it in the classical way. For convenience, the hair at the junction can temporarily grab a rubber band.
When the hairstyle is ready, the gum is gently removed. Another variant of the hairstyle is that each strand is woven into a "spikelet", then the braids are woven to the back of the head, after which they are joined into one. This hairstyle is a combination of "fish tail" and "malvinki."
After the pigtails are joined together, the loose ends of the hair are combed. If you want to hide the gum at the junction, it is wrapped in a strand of hair and the free end of the strand is fixed with invisible hair.
How to braid braid on the side in the technique of fish tail
To braid the braid to one side, you need to divide the well-combed hair into two strands and transfer it to one side. In this case, the spit begins to trail from below, in the ear region. For convenience, you can hook the hair in the tail, using a thin pharmacy gum.
After the braid is ready, the gum is cut and the base of the hairstyle is gently straightened. The side on which the braid is woven usually depends on the leading hand: for right-handers, the right, for left-handers, respectively, the left.
For more complex and interesting styling is used weaving from the temple:
- Two thin strands are separated from the forehead and a braid is woven to the middle of the ear, which goes sideways. The spin must be thin.
- The tip of the resulting braid is temporarily fixed with a rubber band.
- The free part of the hair is divided in half.
- From the braided braid they remove the elastic, and attach the strands of the braid to the loose strands of hair.
- Spit trailing further in the classical technique to the desired length, the end is fixed with an elastic band.
How to make a fishtail vice versa (reverse weaving of a spit)
To make the hair more interesting, you can braid the braid in reverse order:
- On the top, three strands of hair are separated and intersect, as if a regular braid were braiding, but the strands must not be passed one by one over the other, but carried out from below.It is enough to do it once, so that there are two strands of different thickness in the hands.
- We take a narrow strand from the side of a thinner strand, draw it under the main strand and attach hairstyles to the second part. At the same time, a narrow strand of loose hair is taken from the same side.
- Repeat the operation on the other side.
- So, skipping narrow strands on each side one below the other, weave a braid.
- When free hair for additional grabs ends, weaving continues on the already formed braid. The end of the braid is fixed in any convenient way.
This braid looks as if lying on the hair on top.
How to wrap a fishtail around a wreath-shaped head, a step-by-step lesson
Fish tail can be laid around the head. To do this, weaving begin at the temple and lead him to the side above his forehead. In this way, you can not only lay your hair a wreath, but also create complex patterns: zigzags, "snails", etc.
An easier way to lay a wreath shaped braid:
- Braid “fishtail” on the side, starting from the ear, as when braiding to one side.
- Raise the braid and lay it must be forehead in the form of a wreath, securing the studs.
You can complicate the hairstyle by braiding two braids: one fits over in a semicircle above the forehead, the second in the same semicircle at the back of the head. The tips are secured by studs or stealth. Thus, braids form a ring around the head.
Photo scheme: how to braid two pigtails fishtail
There are two options for hair with two pigtails "fish tail":
- Two symmetrical braids on both sides of the face. In this case, the hair is divided into two equal parts, each of which is alternately braided using the fishtail technique. You can start weaving from the temple or from the bottom of the ear.
- Two braids trudge from the temples. In the area of the neck, they are joined together with a gum, the resulting tail is combed.
This hairstyle is particularly well suited to the folk style and style of "country".
Triple fish tail
The technique of weaving such a scythe differs from the classic “fish tail”:
- Carefully combed hair is divided into three equal parts.
- Each part is braided into a regular three-strand braid. In this case, the middle braid begins to weave a little below the two side.
- When the braids are ready, they are woven into one in the same classical way. Due to the fact that the beginning of the side braids is above average, the base of the common braid looks like a semicircle. Especially beautiful this hairstyle looks on thick wavy hair.
Such weaving with the use of ribbons looks more impressive.
Weaving fishtail with banners, photos
The original version of the hairstyle can be added in the process of weaving hauling. In this case, the braid begins to form from the top.
Only central hairs are woven into it, and the remaining strands from the sides are captured in the tail and added to the braid at regular intervals. The number of constrictions depends on the length of the hair, usually they do 3-4.
How to make a fishtail braid bulk and fluffy
The hairstyle of a fish tail is not harmed by slight raggedness and negligence. Moreover, with its help you can visually add volume and pomp to even thin and sparse hair. To do this, the hair in the process of creating hair weave freely. When the braid is ready, the strands are slightly pulled out. Start doing it from the top.
If a volume effect is needed, the spike link must be pulled out entirely. When you pull a small amount of hair from the edge of the link, the braid will look open.
The original design of pigtails fishtail colored chalk for hair
In this hairstyle, highlighting looks especially impressive. If the hair is not dyed or dyed in a single tone, a similar effect can be achieved by using temporary dyeing, for example, with crayons.
Having understood how to weave a fishtail, you can dye strands, both separately and after weaving
You can paint the individual strands before you create a hairstyle, or walk with crayons on top, when the braid is ready.
What accessories are suitable for fishtail hairstyle, photo
For the daily version will be enough gum. However, since you can weave a fishtail in many different ways, and each time it will look different, you can choose a variety of accessories for styling your hair.
Depending on this, the image will be more romantic, vibrant or even informal. For decoration, you can use hairpins, beads, pins, flowers, ribbons, feathers - as far as fantasy allows. The main thing is that the decorations are combined with the general image.
How to braid a fishtail to itself
To do this, it is best to first practice on another person or on a doll. Hair style option is selected based on the desire and level of skill. For convenience, you need to follow simple rules:
- At the beginning, the hair is well combed.
- So that the hair is not confused and more obedient, they need to be slightly sprinkled with water.
- Until a skill is developed, it is necessary to ensure the possibility of visual control over the process. For this, a three-leaved mirror or two mirrors mounted opposite each other would be best.
- To be able to grab the hair in the process of weaving, if you have to be distracted by an unexpected phone call or if your hands just get tired, you need to prepare a hairpin-crab in advance.
Russian braids on the sides
This traditional weaving variant is known to us from early childhood. However, in adulthood, he is also relevant.
1. Comb the hair into two sections.
2. Divide on one side into three parts.
3. Braid a tight or loose pigtail.
4. Secure the tip with silicone.

5. Create the exact same braid on the other side.
6. To give them openwork, stretch the sections with your hands.


French braids vice versa
This hairstyle is suitable for both schoolgirls and adult girls with long hair. Two French braids look very romantic and allow you to remove the strands so that they do not interfere.
- Comb your hair well.
- Divide them in half.
- On the left side of the parting, grab a small strand near the forehead.
- Divide it into three equal sections.
- Begin to braid the classic three-strand braid, laying the strands underneath.
- On the second-third prolette add loose curls on both sides. Do not tighten the strands too much and make sure that the braid runs smoothly.
- Having reached the level of the neck, finish the weaving in the usual way.
- Tie the spit with rubber bands.
- On the right side, take a strand of hair of the same width.
- Divide it into three sections and start braiding the traditional three-strand braid.
- On the second-third prolette add loose curls on both sides. Be careful that both braids are located on the same level.
- Having reached the level of the neck, finish the weaving in the usual way.
- Tie the tip with a rubber band.
- To add volume, stretch the sections a little by hand.
To make it easier to make this trendy hairstyle, consider these photos.

For more details on how to make this hairstyle look at the video at the end of the article.
2 braids on the sides, made in the technique of "fish tail", will make you feminine and tender. They are also performed quickly and easily.
- Comb your hair well.
- Moisten them with water, mousse, spray or conditioner. This will prevent strands from messing up and electrifying.
- Divide the hair in two parts.
- On one side of the parting, select two thin strands (up to 2.5 cm). You can begin to weave either near the ears, or from the temples - it all depends on your desires and skills.
- Cross both strands.
- Holding them with your hand, select another similar strand on the left side. Cross it with the right one and press it tight.
- On the right side, take another strand of hair and cross it on the left.
- Alternately highlighting the strands from one side to the other, braid the braid to the end. Tie a thin elastic band.
- On the other side of the parting, braid the exact same braid. Make sure that they are parallel to each other.
- To add volume, stretch the weave by hand.


Two braids from harnesses
Braids can be created in just 5 minutes without any special skills. It is enough to form two classic bundles - and your hairstyle is ready!
- Wash your hair and blow dry.
- Comb well and moisten your hair with water or apply mousse.
- With a sharp tip of the comb, make a straight parting.
- The hair on the left side of the parting split in half.
- Fly between the two parts.
- Tie the harness tight with a rubber band.
- Divide the strands in half on the other side and form the same harness.
- To keep the hair, spray it with varnish.


The harnesses are braided not only from the level of the neck, but also all over the head. This is done simply:
- Divide the hair into a straight parting. Slam the right side of the clip so that it does not interfere.
- On the left, near the forehead, separate one strand 1 cm wide.
- Just below take the same strand.
- Twist each clockwise.
- Now twist them together (1-2 turns), moving counterclockwise.
- Below, take another strand and twist it clockwise again.
- Twist it with the previous bundle - 1-2 binding counterclockwise.
- Acting on this scheme, reach the level of the neck.
- Finish weaving a simple harness. Tie the tip with a rubber band.
- Loosen the right side of the hair from the clip and braid the exact same harness. Tie the tip with a rubber band.

This classic hairstyle will be an excellent choice for medium and long strands. It combines perfectly with both street and business style.